Receipt Template
Click Store Setting, then select the sub-menu Receipt Template from the navigation panel on the left side of the main interface. The Receipt Management page will be displayed. Through this page, you can set different receipt templates based on your requirements or view the printer information.
Business Information Format
This section is intended to set the relevant store and seller information that you want to display on the receipt and refund receipt.
- Click the Business Information Format tab at the top section of this page. The interface shown in the image below will appear.
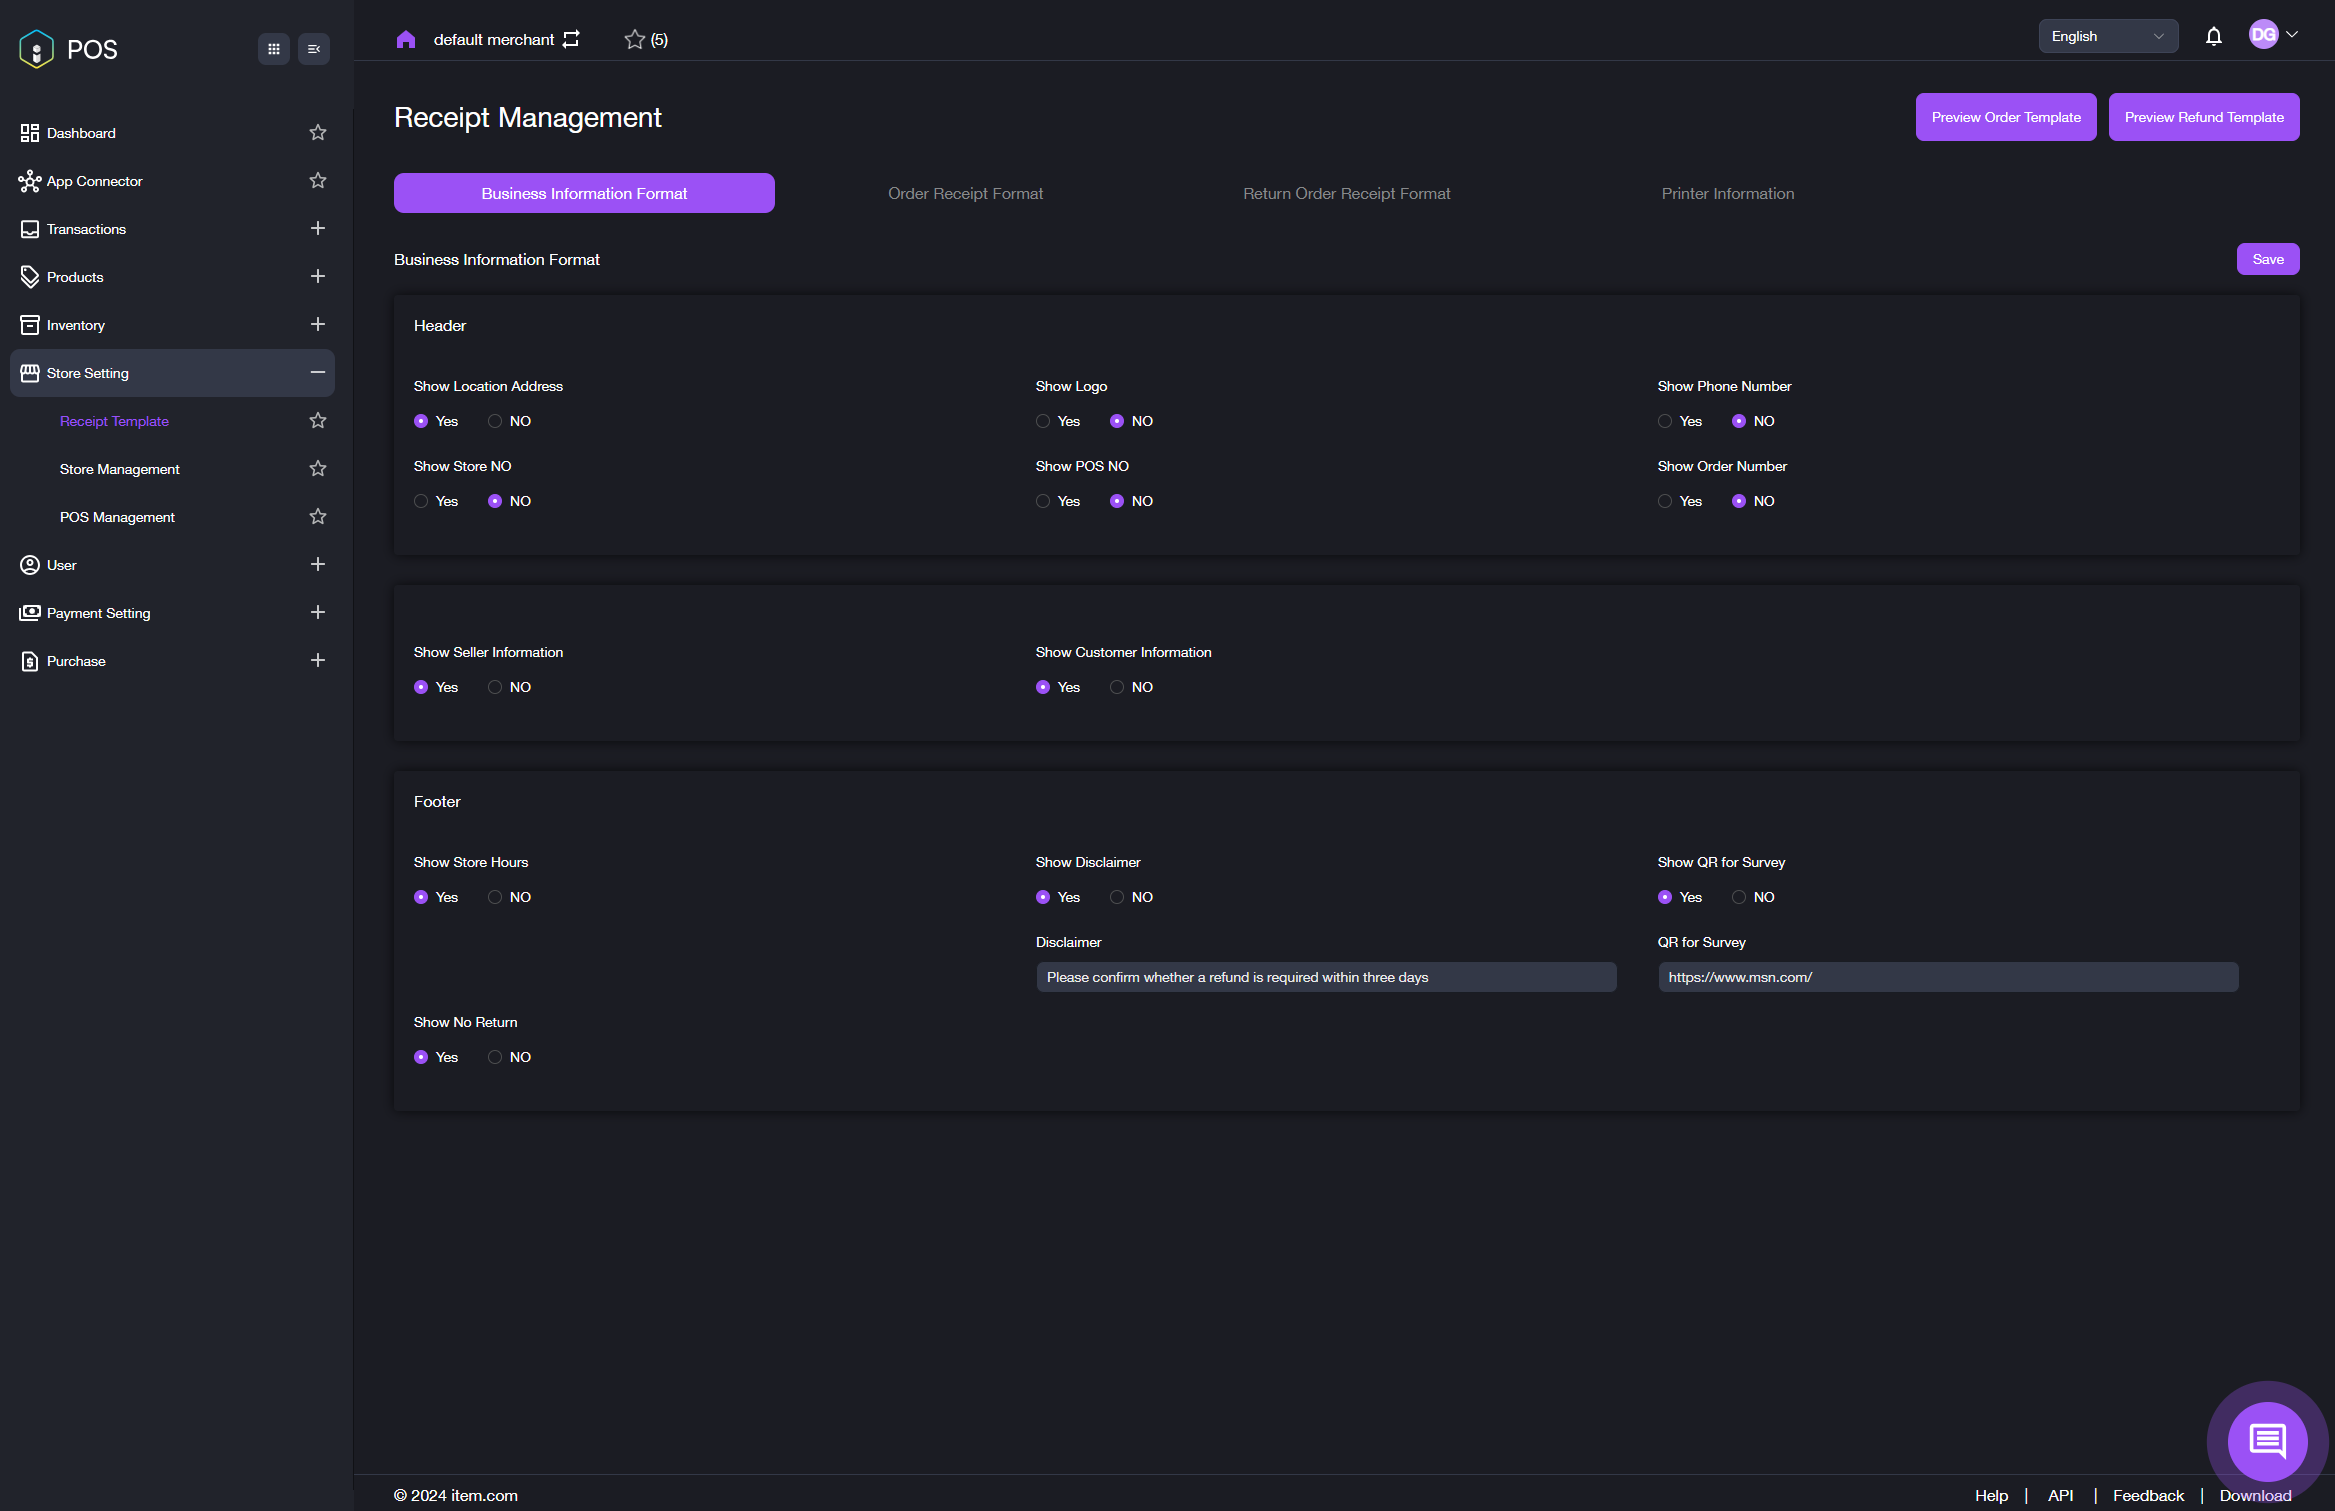
-
Set the business information by selecting the options based on your requirements.
-
Header: Choose Yes or No to decide whether to display the address, logo, phone number and store number, as well as the POS device number and order number.
Tips: Here are some remarks for displaying these elements on your receipt.
Showing address: Useful for customers needing location details or for return purposes.
Showing logo: Enhances branding and recognition.
Showing phone number: Helps address customer inquiries and provides better support.
Showing store number: Refers to a specific identifier for your store location, which is helpful for multi-location businesses.
Showing POS device number: Aids in tracking transactions if you have multiple point-of-sale devices.
Showing order number: Beneficial for tracking and reference during customer interactions. -
Seller/Customer information: Choose Yes or No to decide whether to display the seller and customer information.
Tip: Displaying seller and customer information fosters trust and transparency in the transaction, reassuring customers about the legitimacy of the business.
-
Footer: Choose Yes or No to decide whether to display the store working hours, disclaimer, QR code for survey, and whether the product is returnable.
Tips: Here are some remarks for displaying these elements on your return receipt.
Showing store working hours: Provides customers with essential information about when they can visit or contact the store, improving convenience.
Showing disclaimer: Protects the business by clarifying terms and conditions, reducing potential misunderstandings or disputes.
Showing QR code for survey: Encourages customer feedback, helping the business gather insights for improvement and enhance customer satisfaction.
Showing product returnability: Clearly communicates return policies, helping customers make informed purchasing decisions and reducing confusion.
-
Order Receipt Format
This section is intended to set the relevant order information that you want to display on the receipt.
- Click the Order Receipt Format tab at the top section of this page. The interface shown in the image below will appear.
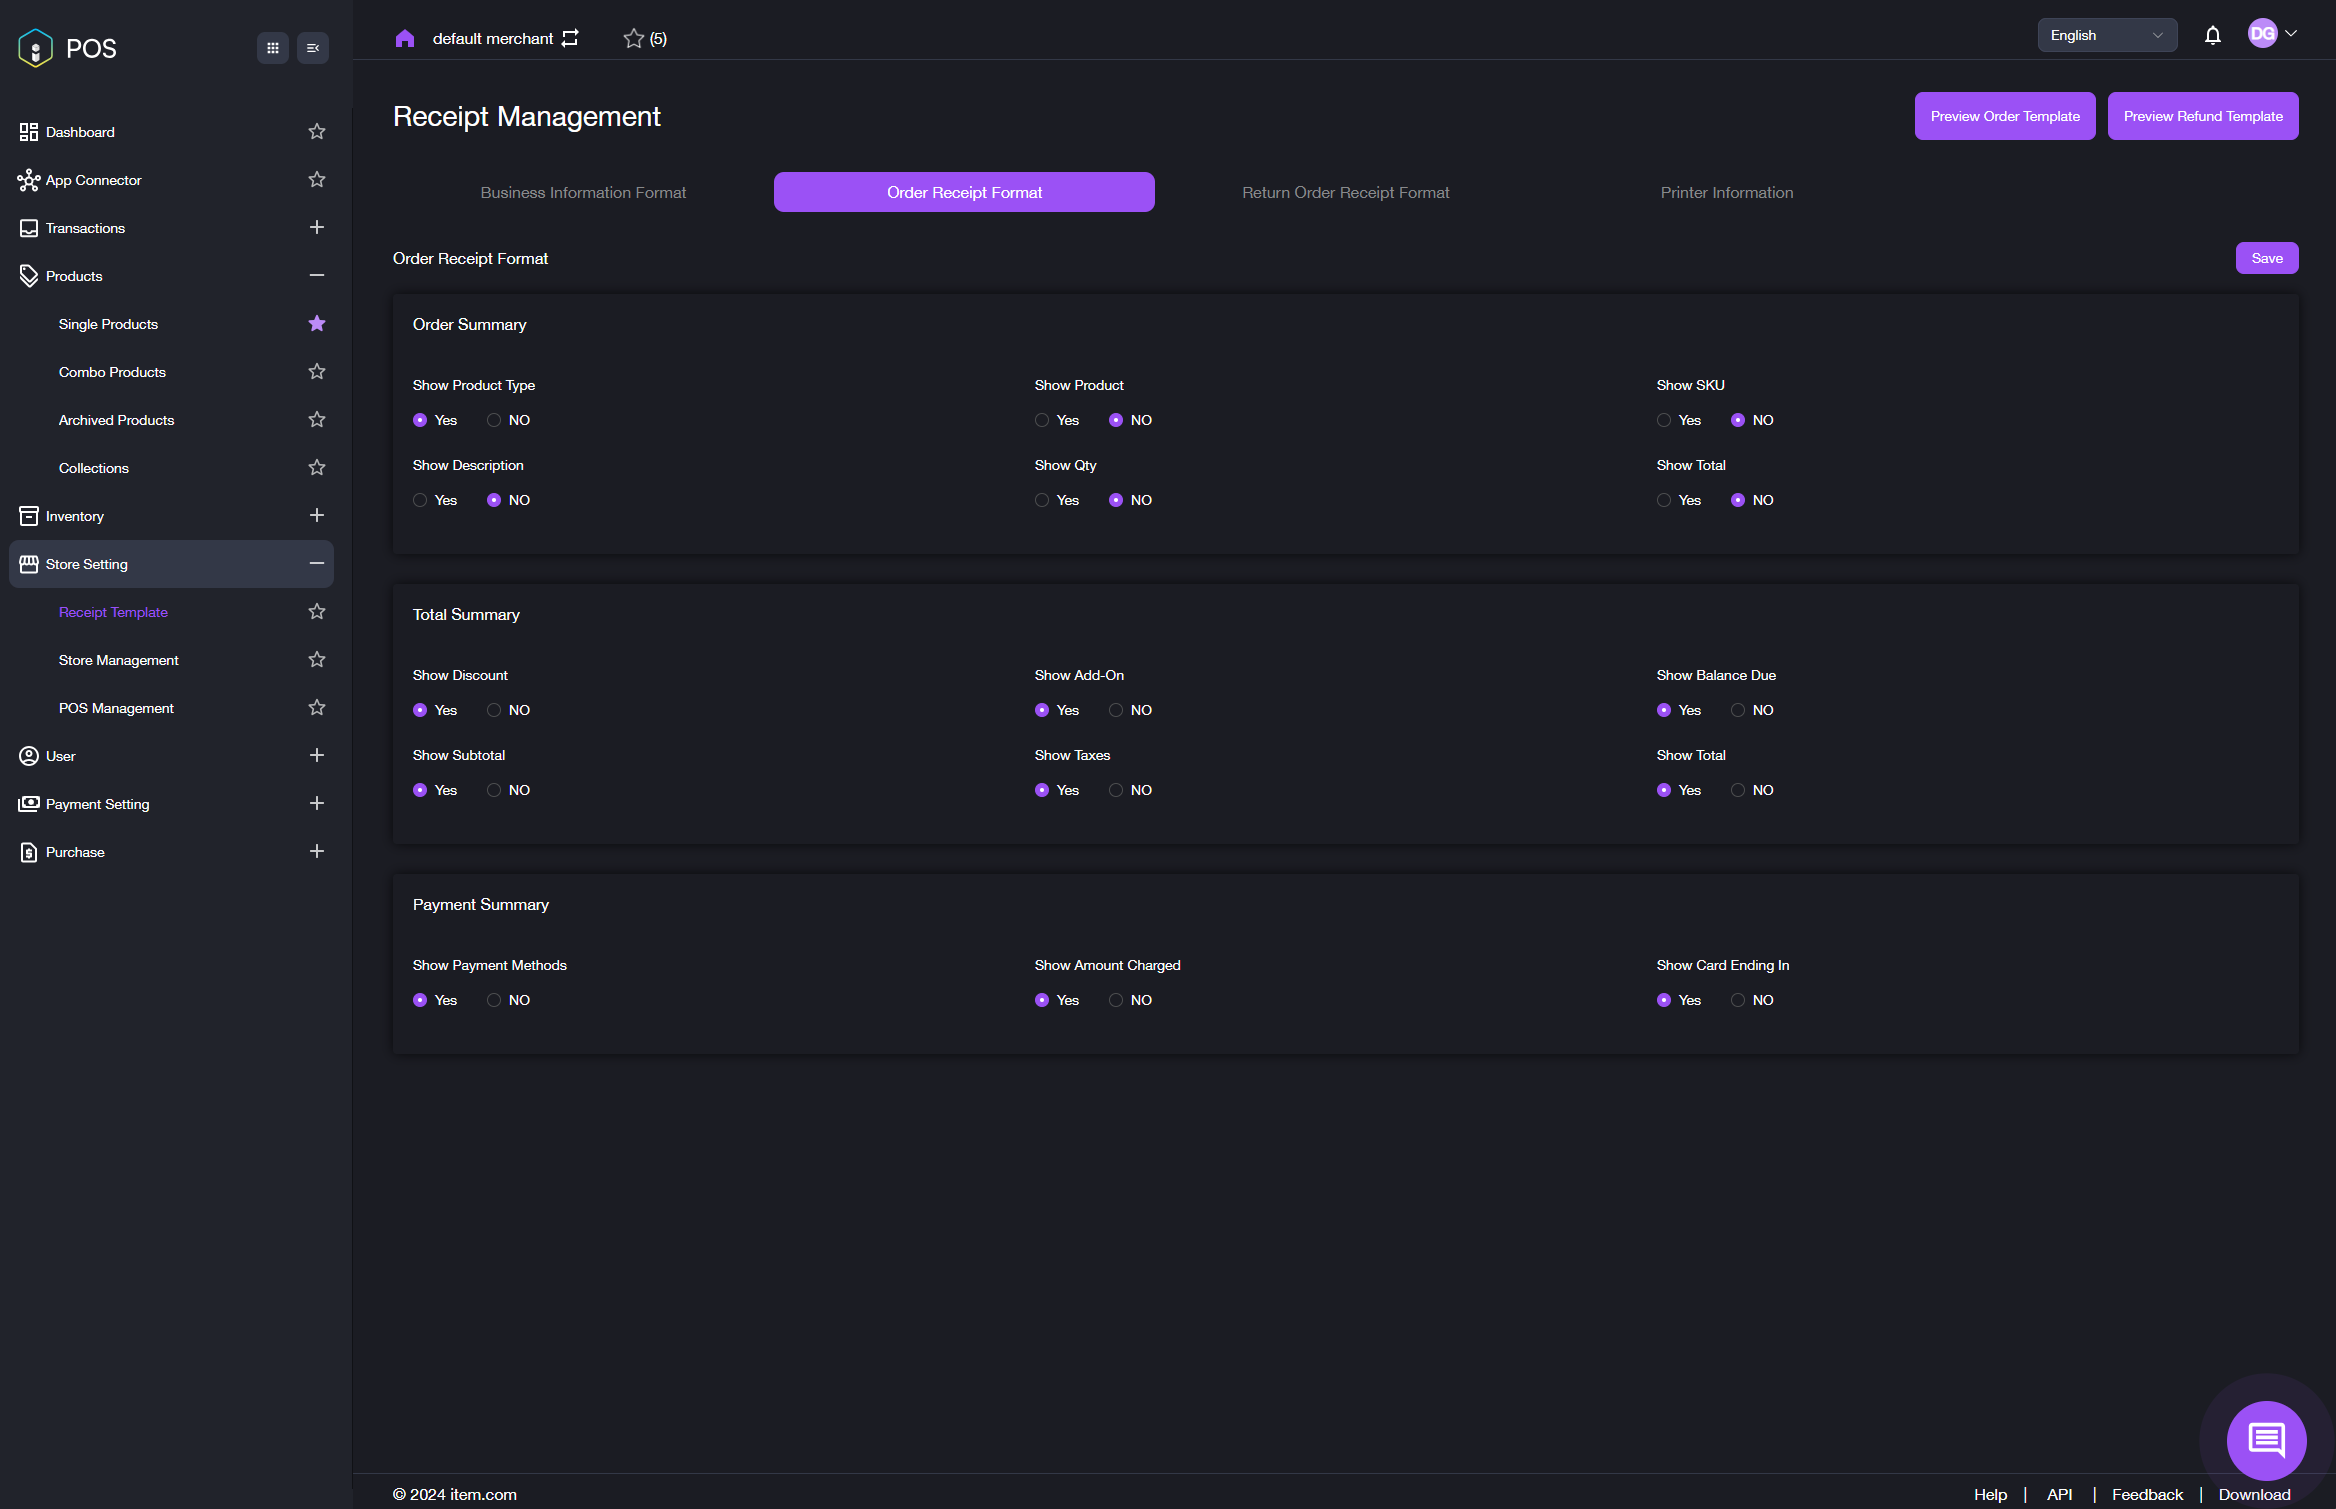
-
Set the product information by selecting the options based on your requirements.
-
Order Summary: Choose Yes or No to decide whether to display the product type, product, SKU, description, quantity and total amount.
Tips: Here are some remarks for displaying these elements on your receipt.
Showing product type: Helps categorize items, making it easier for customers to understand what they purchased. This is useful for businesses with diverse product lines, as it aids in organization.
Showing product name: Clearly identifies the specific item purchased, which is crucial for customer satisfaction and for reference during returns or inquiries.
Showing SKU (Stock Keeping Unit): Provides a unique identifier for inventory management and can streamline return processes. This is particularly valuable for retailers with large inventories, allowing for efficient tracking and restocking.
Showing description: Offers additional details about the product, helping customers remember their purchase and understand features.
Showing quantity: Clearly indicates how many of each item were purchased, important for both customer records and inventory management.
Showing total amount: Summarizes the cost of the order, providing transparency and clarity regarding the transaction.Showing these elements can enhance the customer experience by providing clear and useful information, which can also reduce customer service inquiries and improve overall satisfaction.
-
Total Summary: Choose Yes or No to decide whether to display discount information, add-on information, outstanding balances, subtotal, taxes, and total.
Showing discount information: Increases transparency and encourages customer loyalty by clearly showing savings.
Showing add-on information: Helps customers understand additional options available, enhancing their overall experience.
Showing outstanding balances: Provides clarity on what is owed, aiding in financial planning for customers.
Subtotal: Summarizes costs before taxes and discounts, helping customers track their spending.
Showing taxes: Ensures compliance and prepares customers for the final amount, avoiding surprises.
Showing total: Gives a clear final figure, facilitating informed purchasing decisions. -
Payment Summary: Choose Yes or No to decide whether to display the payment methods, the amount charged, and the card ending in.
Showing payment methods: Clarifies which payment options were accepted, reinforcing trust in the transaction process.
Showing amount charged: Ensures transparency by confirming the exact amount paid, helping customers verify their expenses.
Card ending in: Provides a reference point for customers to confirm which card was used, enhancing security and minimizing errors.
-
Return Order Receipt Format
This section is intended to set the relevant return order information displayed on the receipt.
- Click the Return Order Receipt Format tab at the top of this page. The interface shown in the image below will appear.
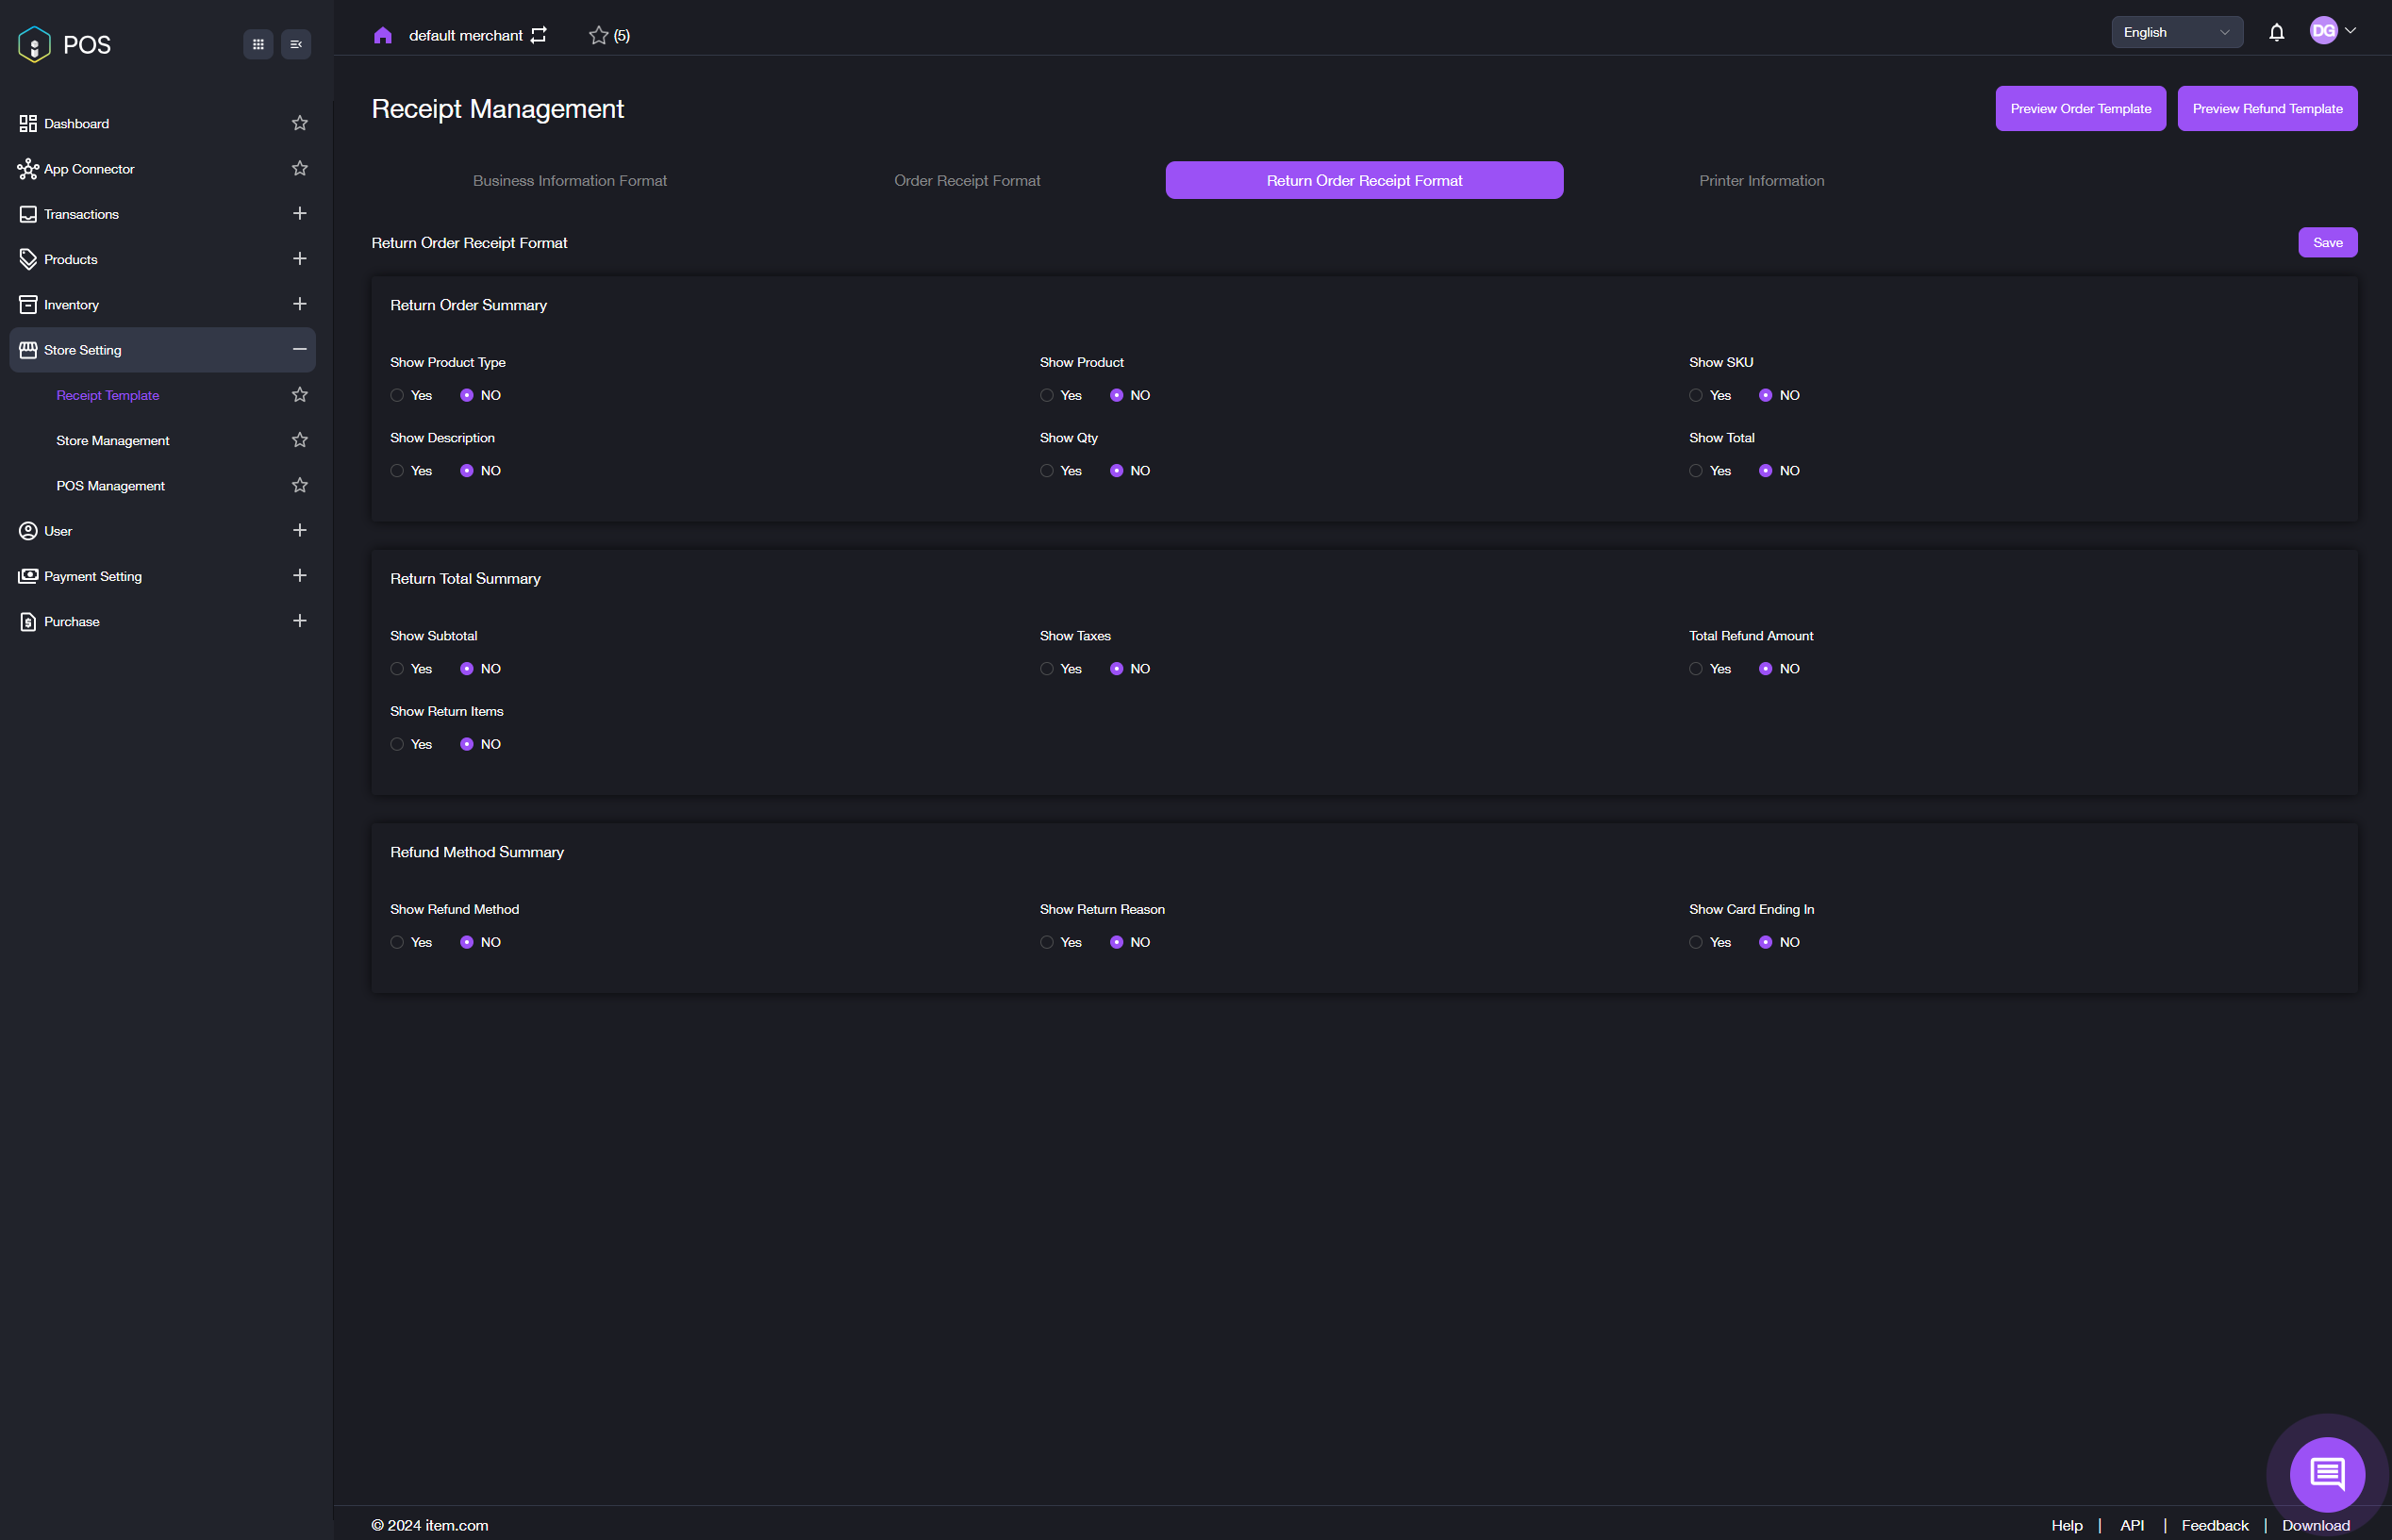
-
Set the information of the product to be returned by selecting the options based on your requirements.
-
Return Order Summary: Choose Yes or No to decide whether to display the product type, product, SKU, description, quantity and total amount.
Tips: Here are some remarks for displaying these elements on your receipt.
Showing product type: Helps customers quickly identify the category of the product to be returned, making it easier to process the return correctly.
Showing product name: Provides clear identification of the exact item, reducing confusion and ensuring that both the customer and retailer are on the same page regarding the return.
Showing SKU (Stock Keeping Unit): The SKU is a unique identifier that allows for efficient inventory management and tracking. It ensures that the correct item is being processed for return.
Showing description: A brief description provides context about the product, helping to confirm the details of the return and reducing errors in processing.
Showing quantity: Displays how many items are being returned, which is crucial for accurate inventory updates and understanding the nature of the return.
Showing total amount: Clearly indicates the financial aspect of the return, helping customers understand potential refunds and maintaining transparency in transactions. -
Return Total Summary: Choose Yes or No to decide whether to display subtotal, taxes, refund amount, and return items.
Tips: Here are some remarks for displaying these elements on your receipt.
Showing subtotal: Clearly displays the original cost of returned items, helping customers understand what they are returning and enhances the trust.
Showing taxes information: Provides the comprehensive understanding by showing the exact amount of taxes applied to the purchase.
Showing refund amount: Clearly indicates the amount the customer can expect to receive back, reducing confusion or disputes; increases customer satisfaction by making the refund process more transparent.
Showing return item list: Allows customers to verify which items were returned, preventing misunderstandings; helps the business track returned items accurately for inventory purposes.By including these elements, you create a more user-friendly and transparent return process, which can enhance customer trust and satisfaction.
-
Refund Method Summary: Choose Yes or No to decide whether to display refund method, return reason, and card ending in.
Tips: Here are some remarks for displaying these elements on your receipt.
Showing refund method: Provides customers with clear information on how their refund will be processed; helps set expectations regarding the time frame and method of receiving the refund.
Showing return reason: Capturing the reason for the return can help business identify trends and areas for improvement in products or services; shows customers that their feedback is valued, which can enhance their overall experience with the brand.
Showing card ending in: Displays the last few digits of the card used, helping customers verify the refund destination without compromising their full card information; provides a reference point for the customer, making it easier to track their financial transactions.
-
Printer Information
- Click the Printer Information tab at the top section of this page. The interface shown in the image below will appear.

- Select a printer type under Print Command. The options are: ECS/POS, ZPL and TSP.
Note: Choose one type based on your requirements. The details of each option are displayed in a specific section of this user guide.
- Set the paper width of the receipt under Receipt Printer Width. The options are: 44mm, 58mm and 80mm.
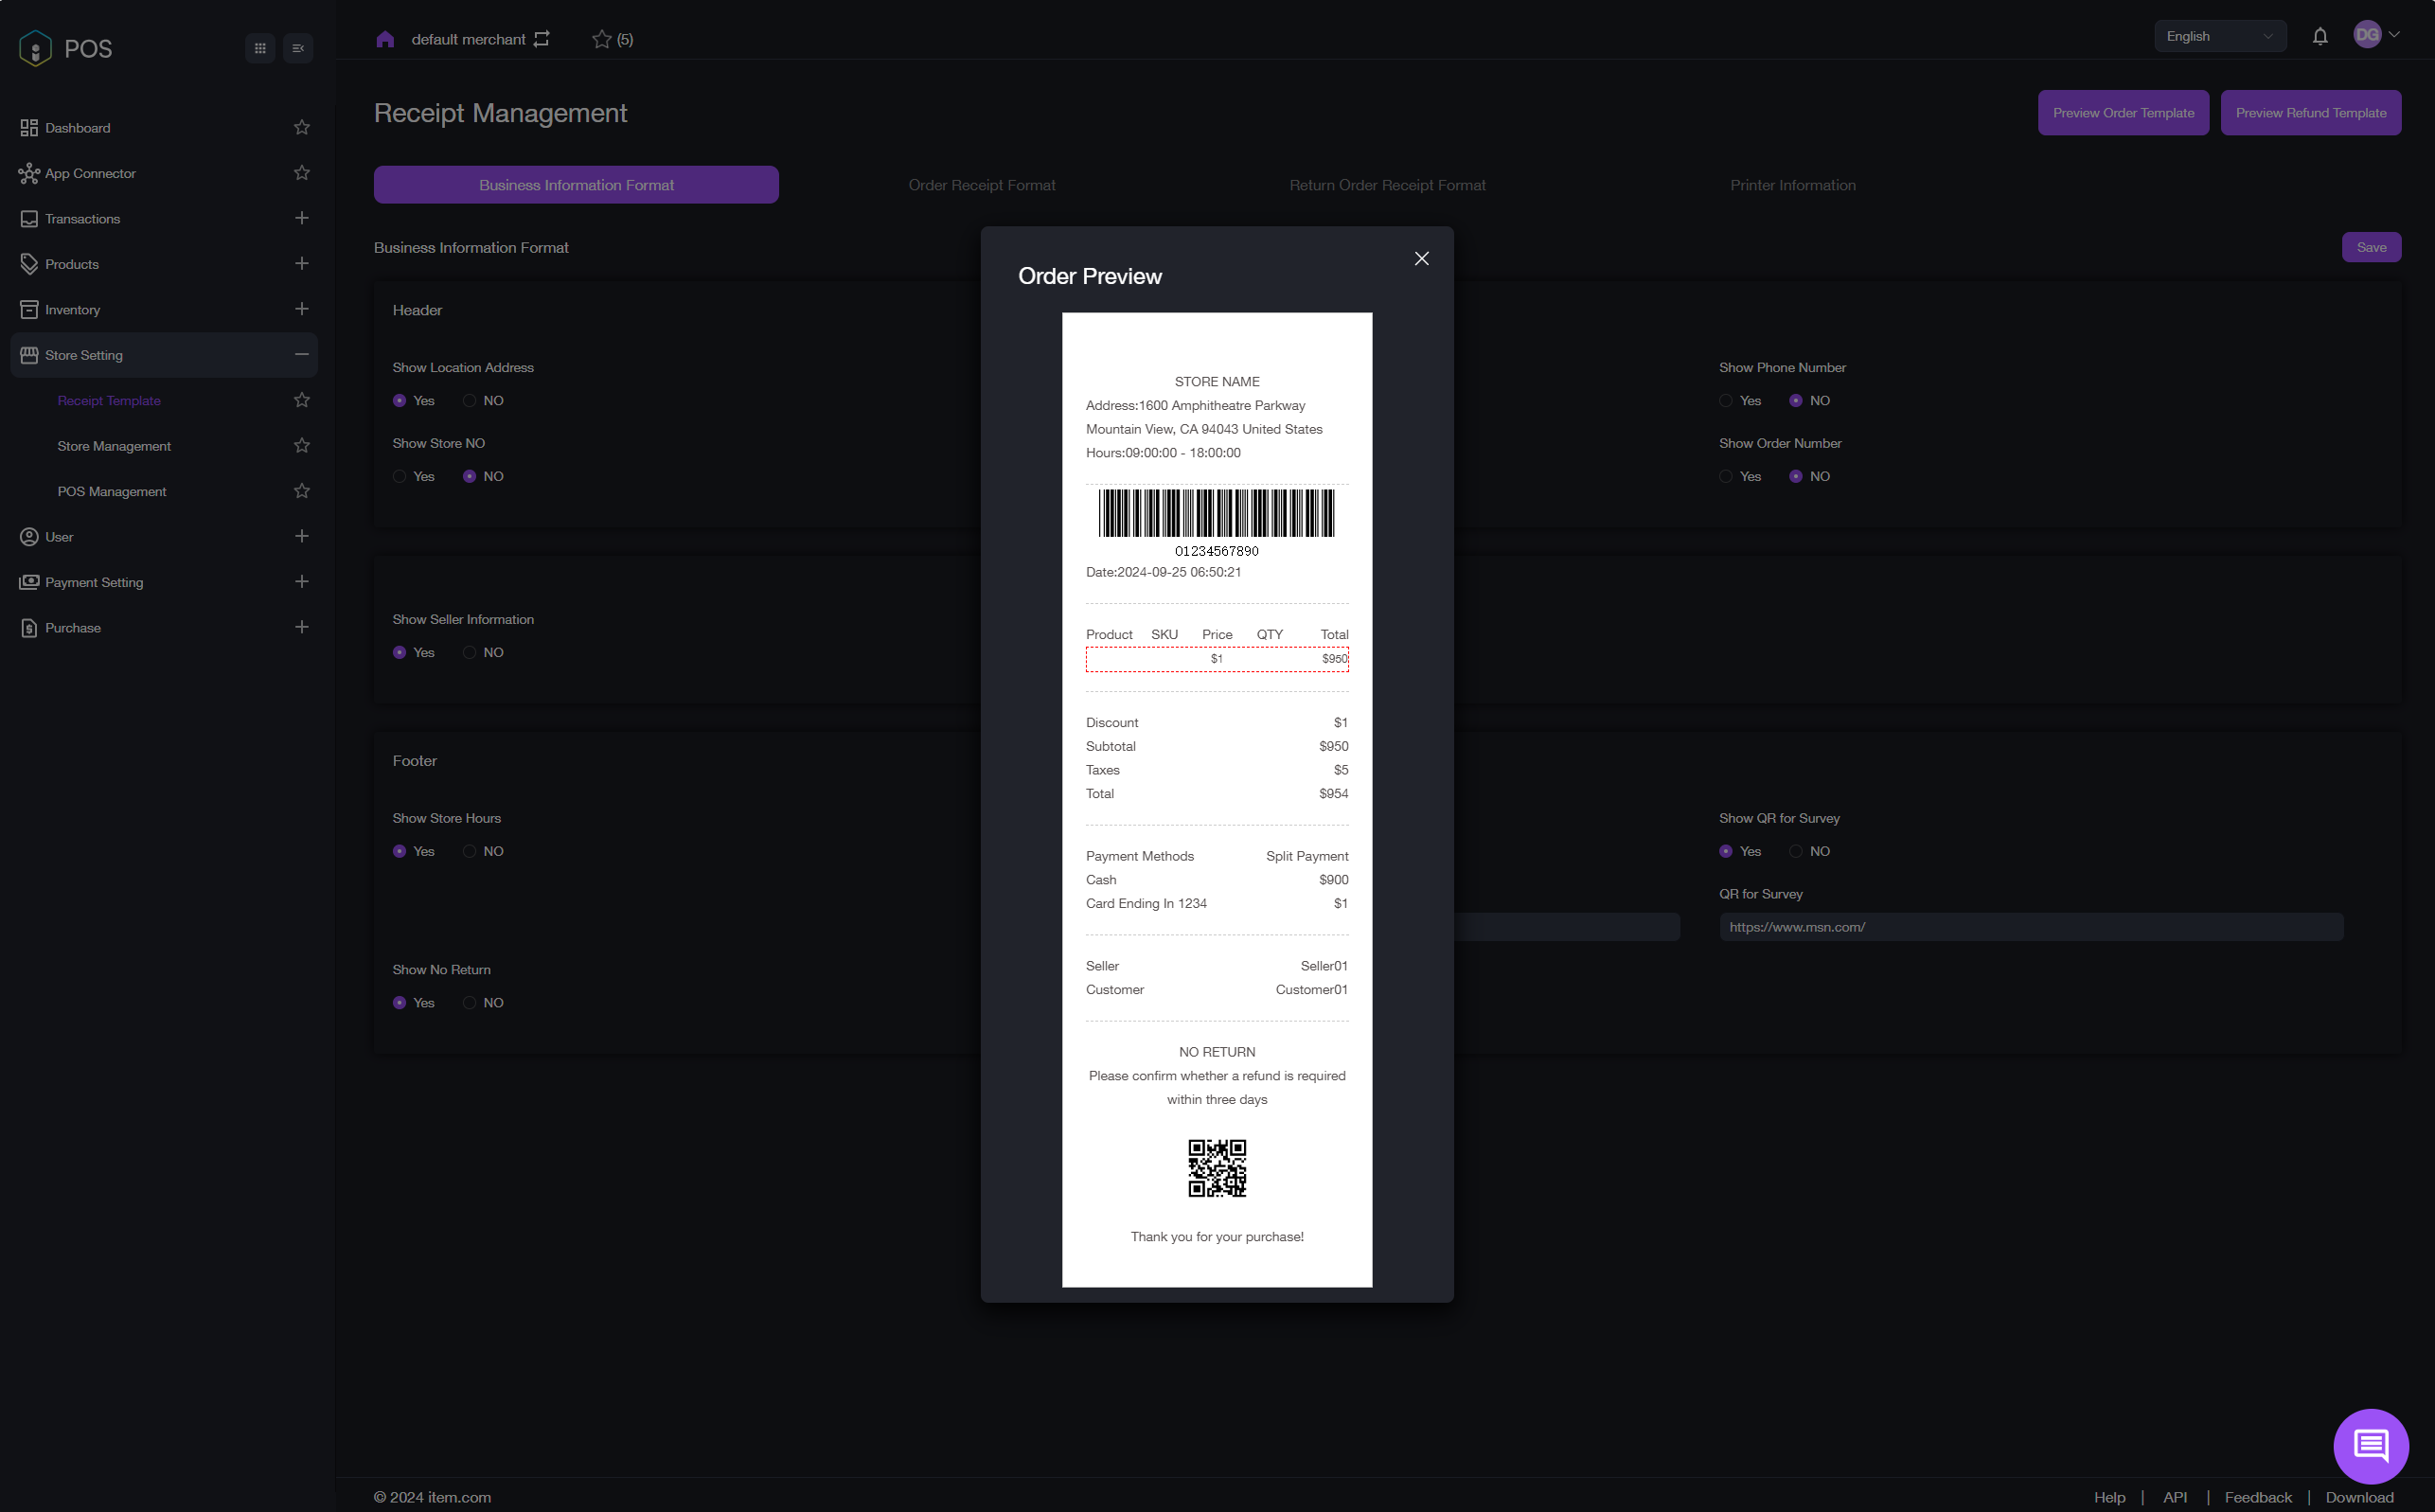
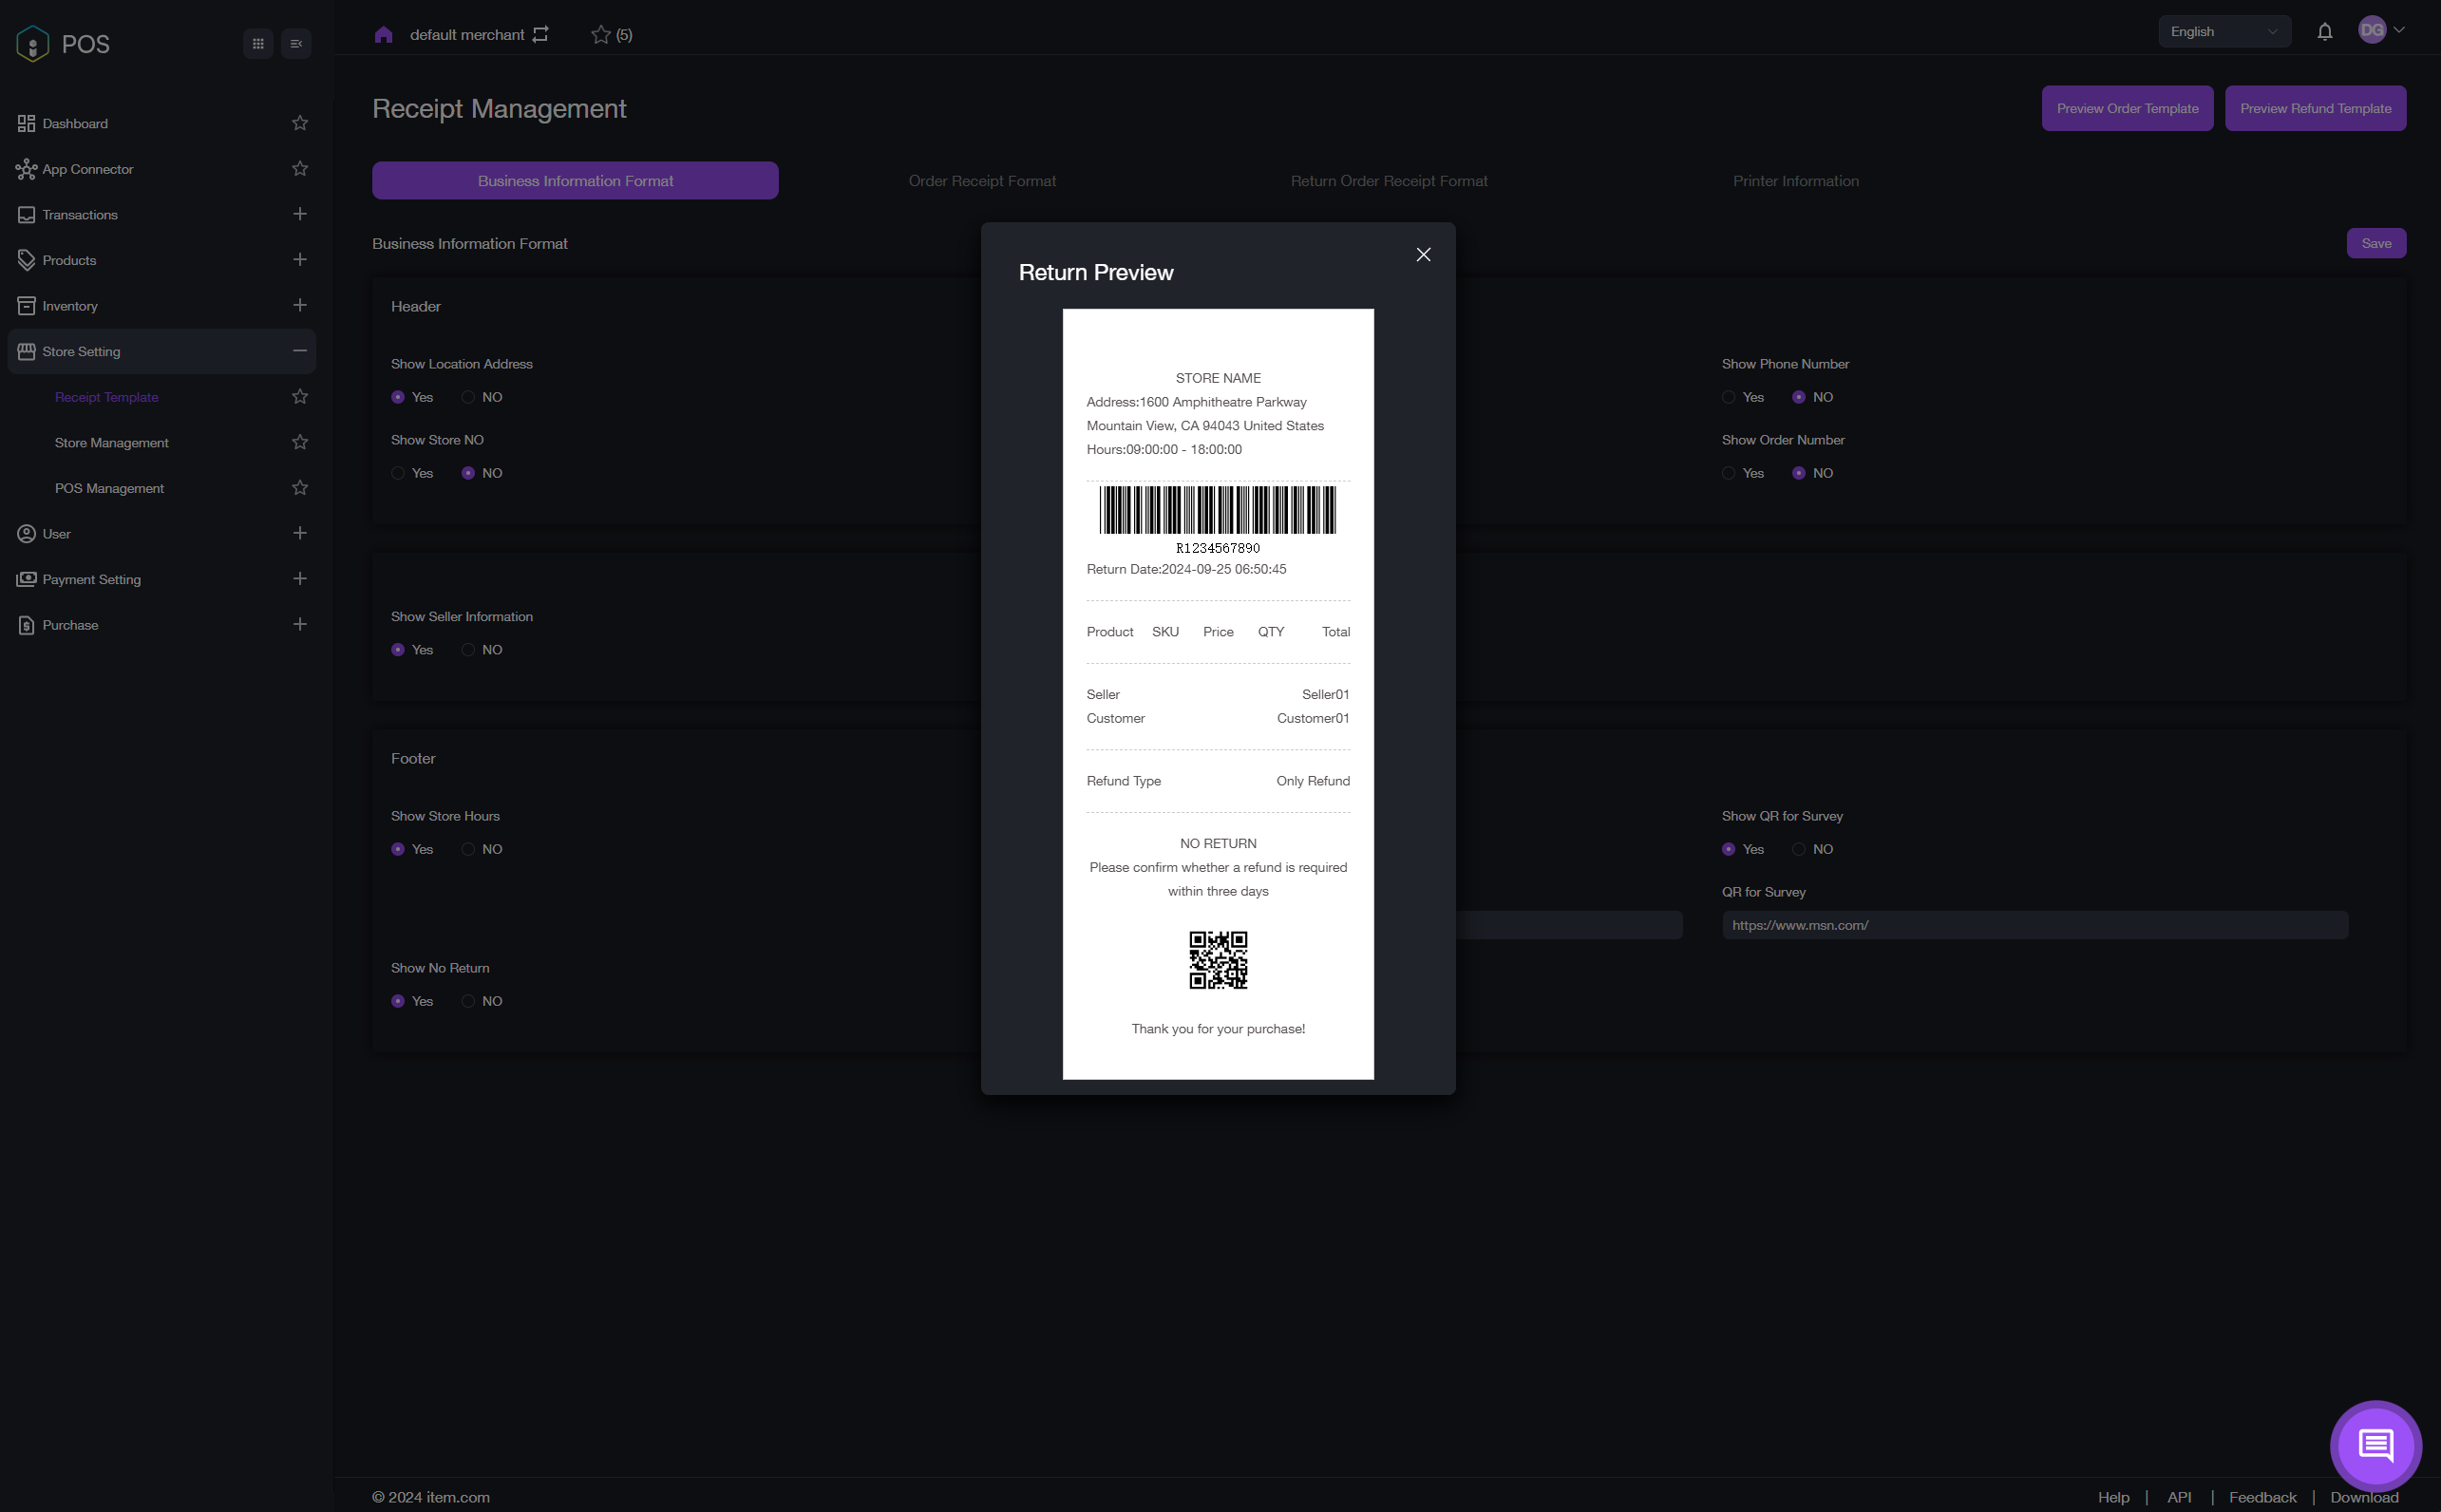
Tip: View the order receipt or return order receipt by clicking the Preview Order Template button or the Preview Refund Template button in the top right corner of the Receipt Management page. Refer to the images below. Check the preview to see if the printed receipt matches your expectations. You can always make adjustments after reviewing.