How to Create and Execute a New Pick Task
Pick inventory to fulfill an order according to the order plan. The assignee will receive the pick task on their mobile app after CSR created the pick task on web. This article introduce the related operations on web and app sides.
How to Create a Pick Task on Web
-
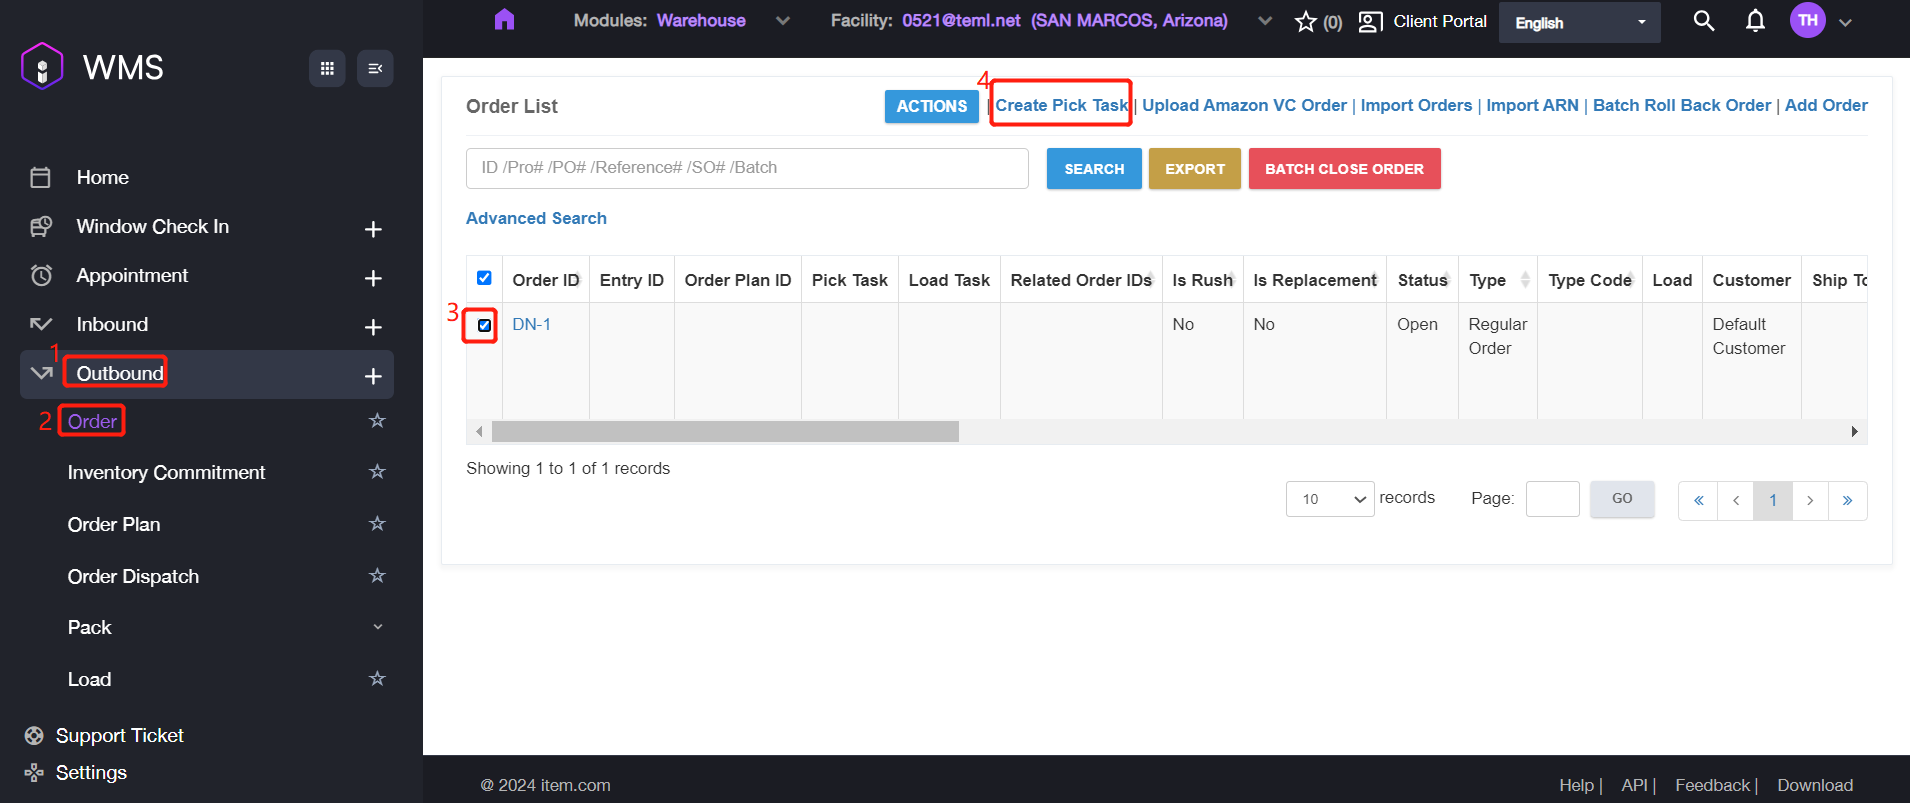
Navigate to Outbound > Order, select an order which you want to create a pick task.
-
Click Create Pick Task button.
-
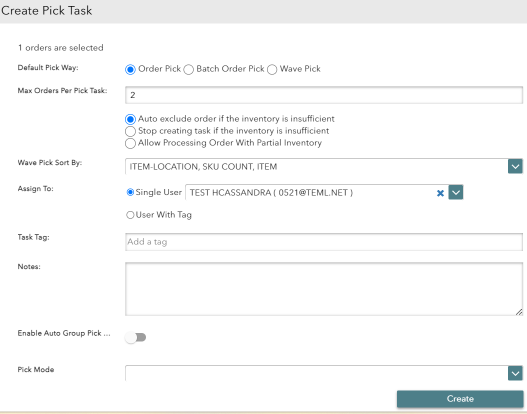
Setup the required fields, then click Create to complete.
There are three pick ways, please select one according to your requirements.
| Pick Type | Description |
|---|---|
| Order Pick | It involves picking items for individual orders. |
| Batch Order Pick | It combines multiple orders to pick similar items in a single pass. |
| Wave Pick | It processes the picking of multiple orders based on scheduled time period or batches. |
After successful creation, the Pick Task ID will display on the corresponding order.
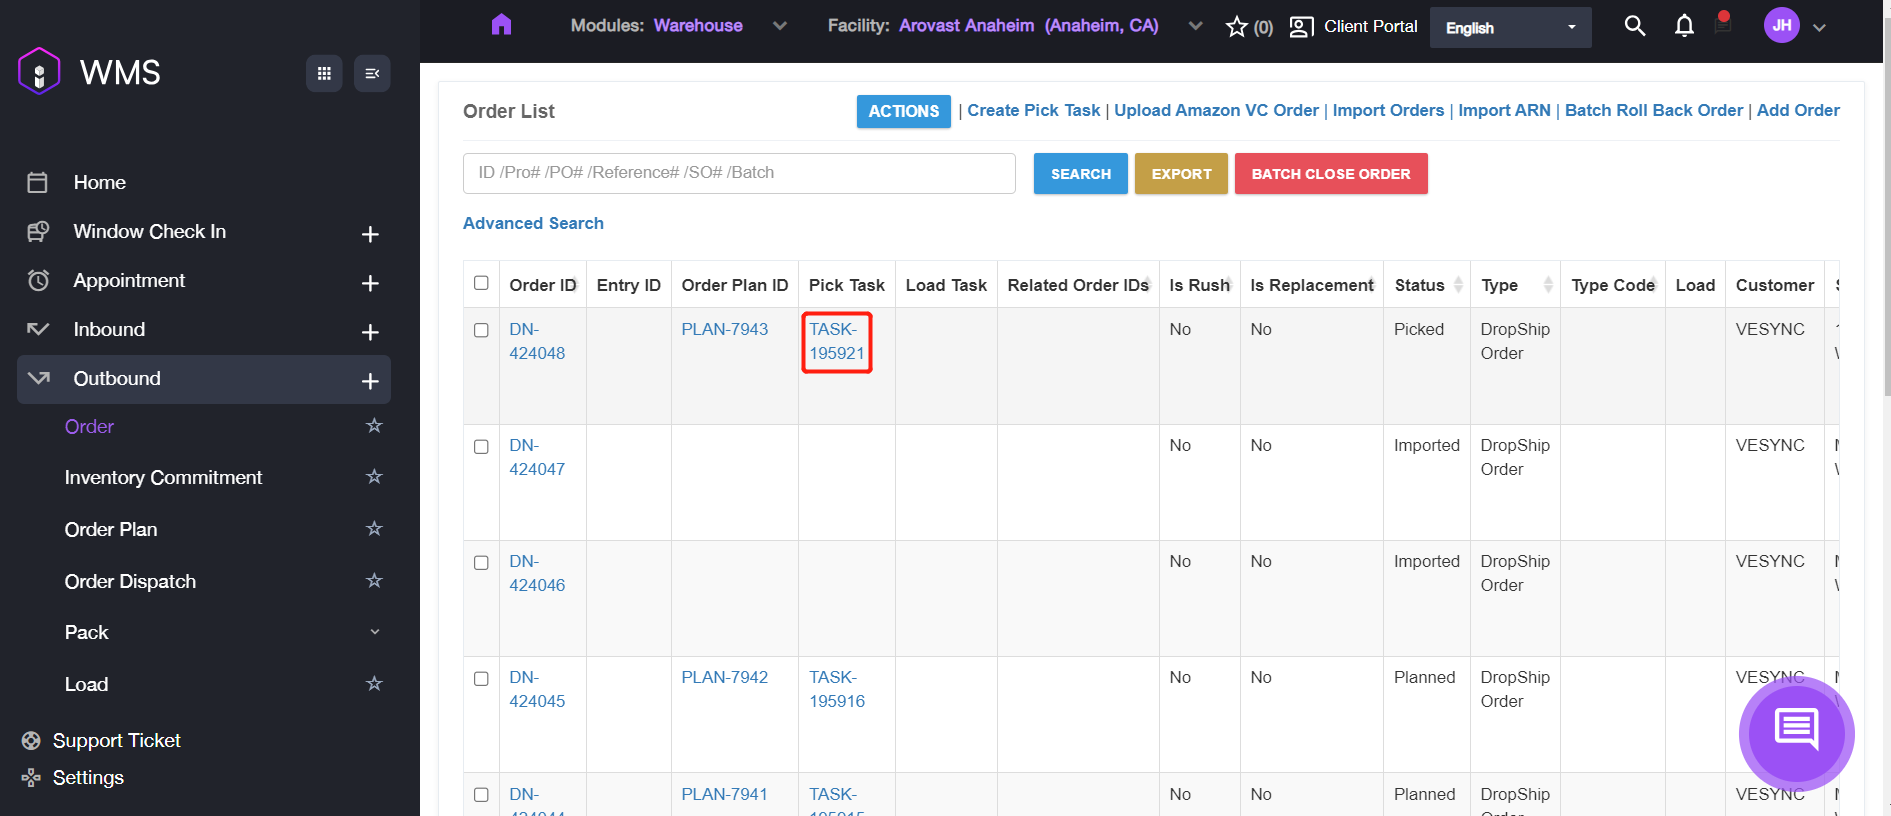
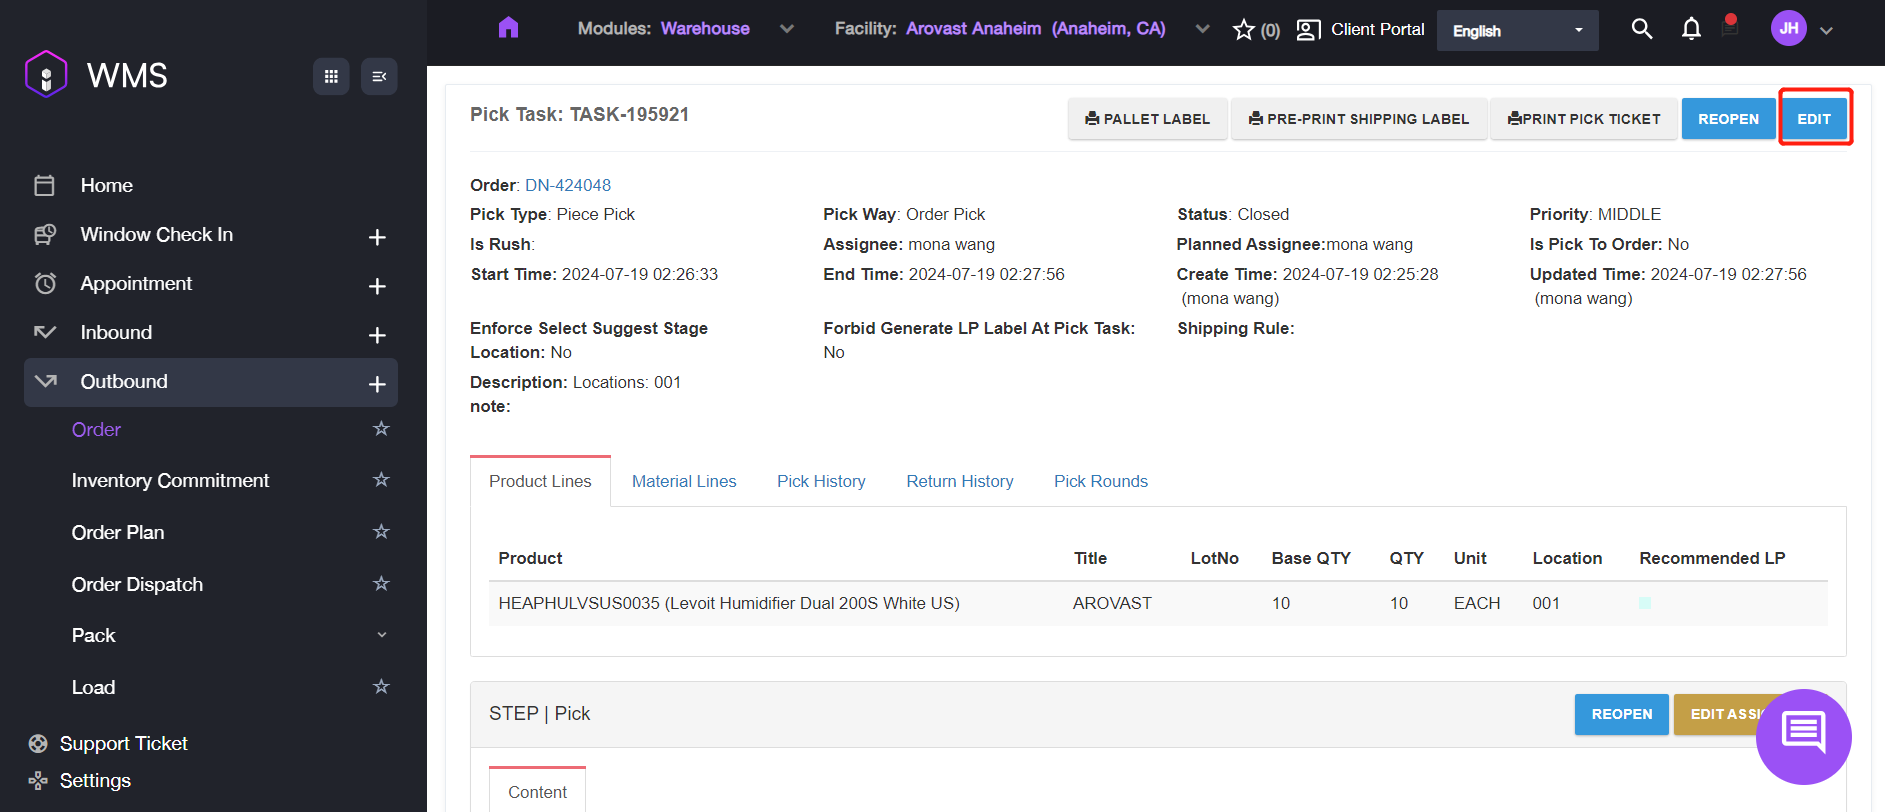
If there anything need to be updated, please click TASK ID to go for details page, then click EDIT button to modify the information.
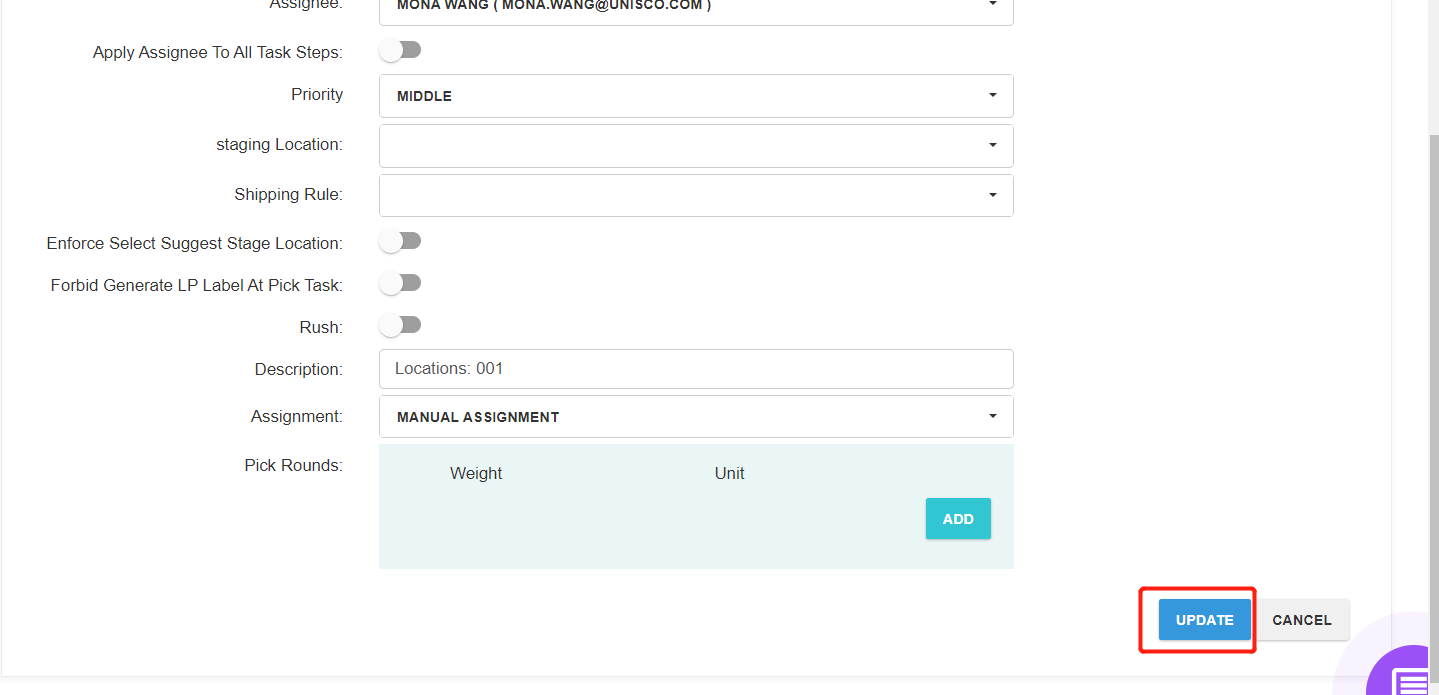
Modify the information then scroll down and click UPDATE to save the data updating.
How to Execute the Pick Task on App
The assignee will receive a task notification on their mobile app, after the pick task has assigned to them. Please refer to the following operations to complete outbound process on the Item WMS App.
Order Pick
Order pick involves selecting and retrieving items from inventory to fulfill customer orders. This process ensures that the right products are picked in the correct quantities and delivered to the appropriate destination efficiently.
Here are the guidance for you to execute the order pick on mobile WMS App.
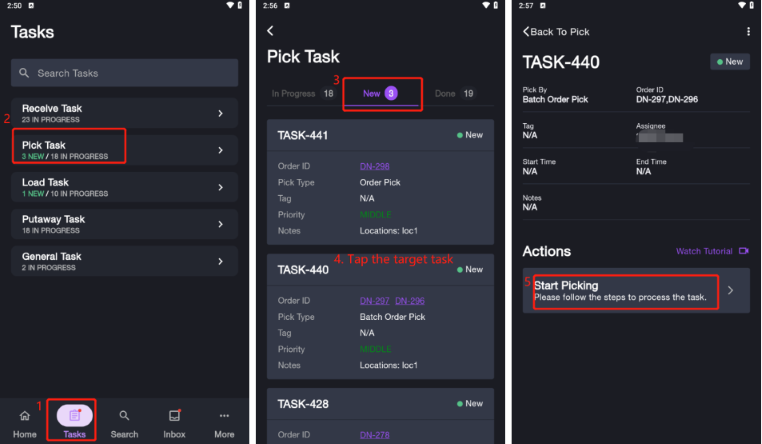
- Go to Tasks > Pick Task > New, tap the target task.
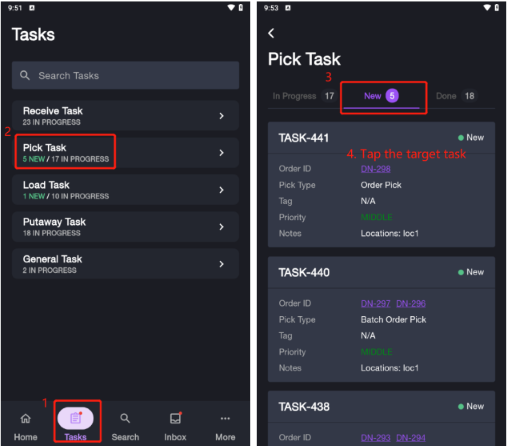
- Tap Start Picking to begin the first step.
- Keep on Work tab, tap the suggested location ID if you want to use it or scan or enter the location. If there is no inventory in this location, please press NEXT LOCATION to get a new suggested location.
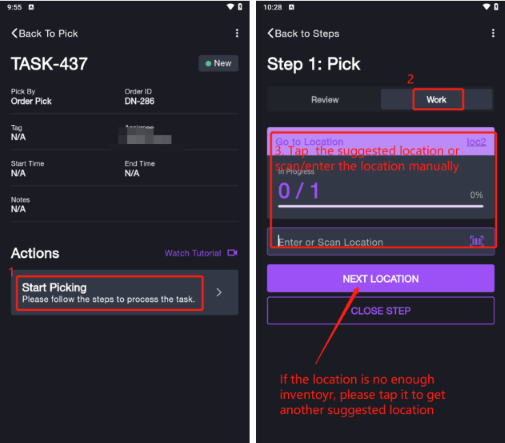
- Fill out the parameters required, such as pallet ID, product, product quantity and etc.
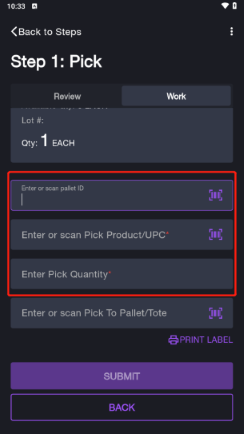
- Tap SUBMIT to save the all data.
Batch Order Pick
Batch Order Pick by Tote Cart
Batch order pick by tote is a method to enhance efficiency when processing multiple orders simultaneously. In this methods, items for several orders are picked at once and stored into individual totes assigned to each order.
For Batch Order Pick by Tote Cart, please setup the Default Pick Way as Batch Order Pick and setup Pick Mode as Pick by Tote Cart when creating the pick task.
Here are the operation steps on WMS app.
- Go to Tasks > Pick Task > New, tap the target task to task page.
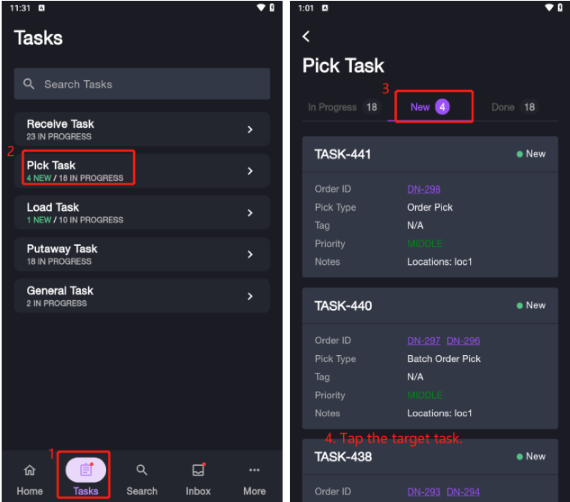
- Tap Start Picking to begin the first step.
- Enter or scan tote cart ID then tap START button to start the picking process.
- Keep on Work tab, tap the suggested location ID if you want to use it or scan or enter the location. If there is no inventory in this location, please press NEXT LOCATION to get a new suggestion.
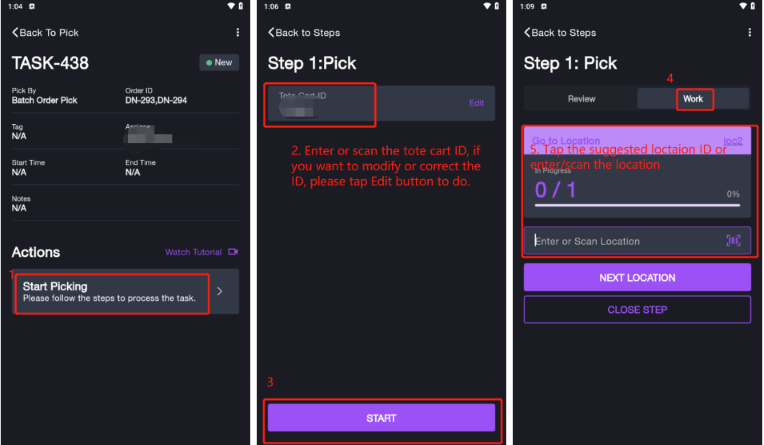
- Enter or scan required data includiing pallet ID, Pick Product/UPC.
- Generally, batch order pick involves multiple orders. Please tap ENTER to enter the corresponding order page, enter Pick Quantity and Pick to Tote, then tap SUBMIT to save the data.
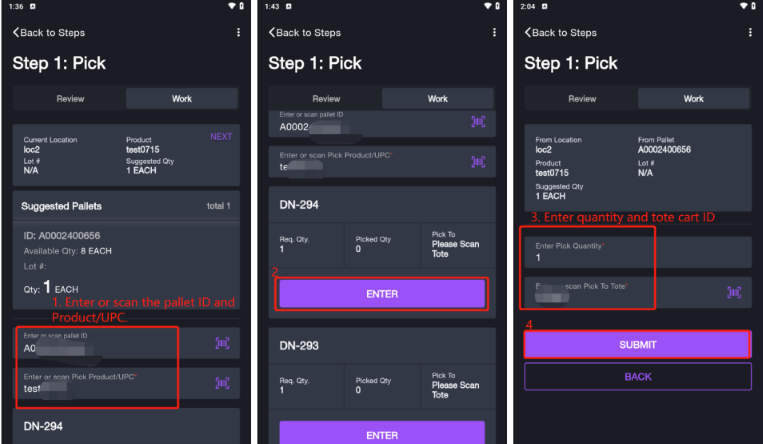
- It will return back to pick details page after submitting the data, please repeat the step 5 and step 6 for completing other orders within this task.
- Tap CLOSE STEP and it will return back to task details page, you will see the status changed to Close.
Batch Pick by Pre-Print LP
Batch Pick by Pre-Print LP involves grouping multiple orders into a batch and pre-printing LP for each order or container before the picking begins. It optimize efficiency and accuracy in high-volume environments.
For Batch Order Pick by Pre-Print, please setup the Default Pick Way as Batch Order Pick and setup Pick Mode as Pick by Pre-print LP when creating the pick task.
Here are the operation steps on WMS app.
- Navigate to Tasks > Pick Task > New, tap the target task.
- Tap Start Picking to start picking process.
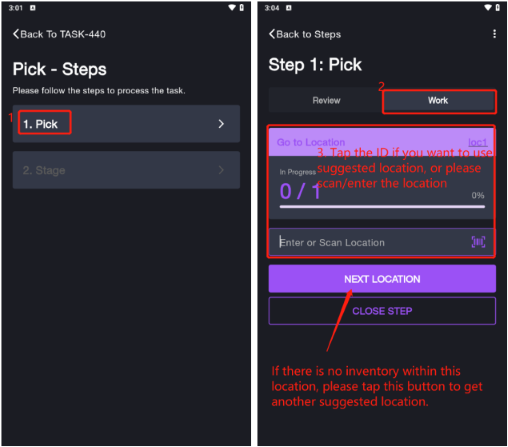
- Tap Pick to start the first step. Keep on Work tab, enter or scan the location. If you want to use the suggested location, please tap the location ID. If there is no inventory within the location, please tap NEXT LOCATION to get another suggested location.
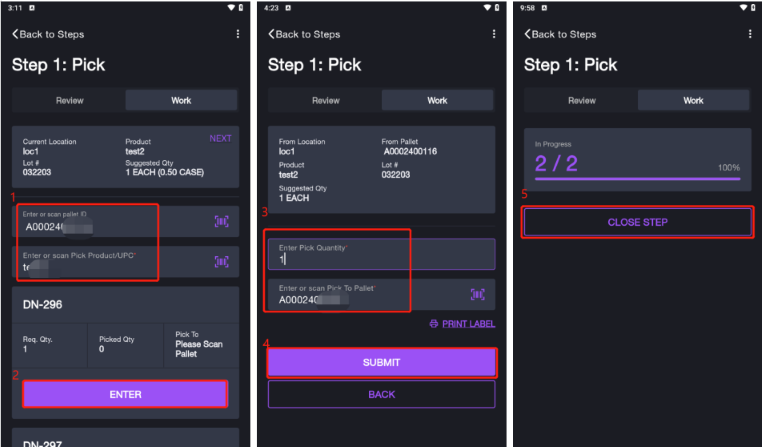
- Enter or scan pallet ID and Pick Product/UPC, then tap ENTER button to enter the corresponding order’s details page.
- Enter the Pick Quantity, enter or scan the Pick to Pallet, then tap SUBMIT to save these data.
- Please repeat step 4 and step 5 to complete the remaining orders. After submitting all orders, tap CLOSE STEP to return back to step page, it will mark pick as Completed stats.
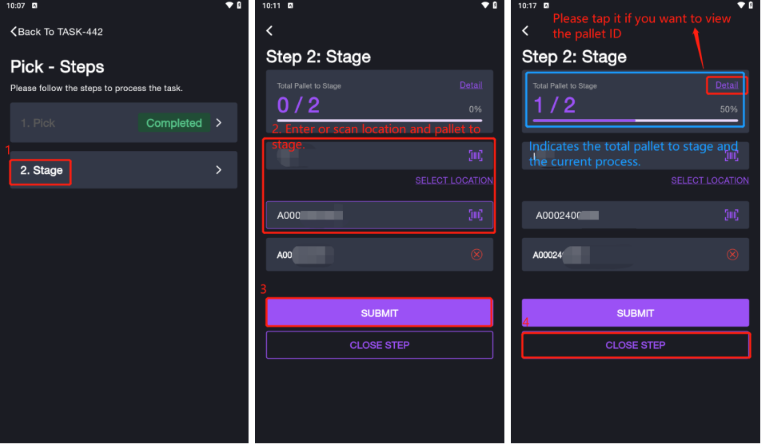
- Tap Stage to start the second step.
- Enter or scan Location and pallet to stage, then tap SUBMIT to save the data.
- Repeat step 8 to complete scanning all pallet to stage and saving the data. On the top of the interface, it prompts the total pallet and the current process. If you forget the pallet ID, please tap Detail button to view.
- Tap CLOSE STEP button to complete this pick task.
Wave Pick
Wave pick is a strategy used to optimized the picking process by grouping orders into waves, which improves efficiency and reduces labor costs.
This section explains how to execute wave pick by item on mobile app.
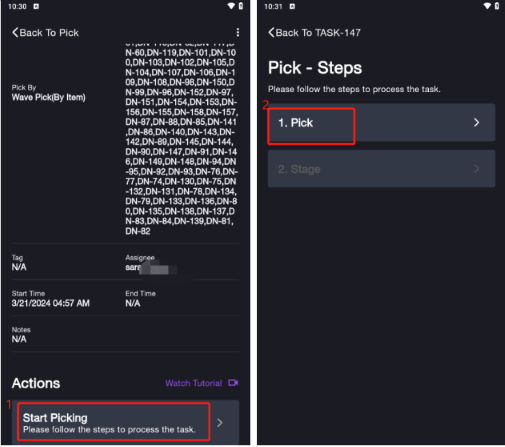
- Go to Tasks > Pick Task > New, tap the target task.
- Tap Start Picking to begin the task, then tap Pick to process the first step.
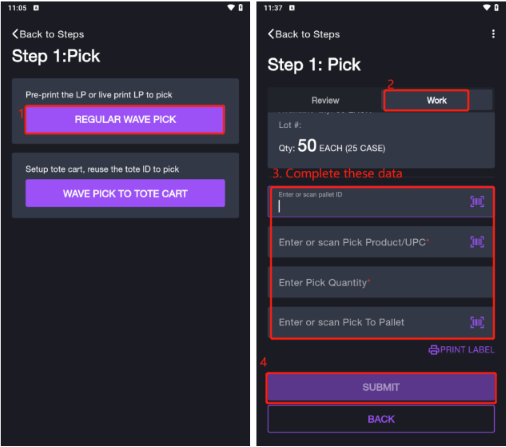
- There are two mode for wave pick, select one mode and tap corresponding button to continue the picking.
| Mode | Description |
|---|---|
| Regular Wave Pick | Pre-print the LP or live print LP to pick. |
| Wave Pick to Tote Cart | Setup tote cart, reuse the tote ID to pick. |
Please follow the sections below to complete the corresponding pick step.
- Tap Stage to start the stage step.
- Scan or enter location and pallet to stage, then tap SUBMIT to save data.
- Tap CLOSE STEP then go back to task homepage.
Wave Pick to Tote Cart
- Enter or scan tote cart ID then tap START button to start this picking process.
- Keep on Work tab, then enter or scan location ID or tap the location ID at the top-right corner. If there is no inventory within this location, please tap NEXT LOCATION button get a new suggested location.
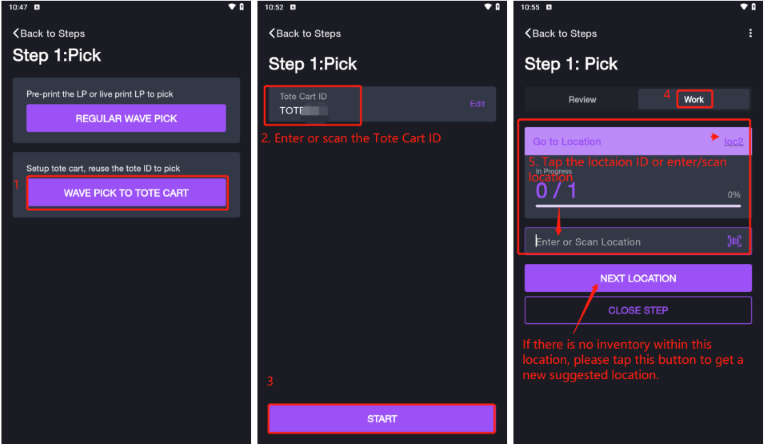
- Enter or scan these data including pallet ID, Pick Product/UPC, Pick Quantity, Pick To Tote. Then Tap SUBMIT to save the information, tap CLOSE STEP.
Regular Wave Pick
- Keep on Work tab, then enter or scan location ID or tap the location ID at the top-right corner. If there is no inventory within this location, please tap NEXT LOCATION button get a new suggested location.
- Enter or scan these data including pallet ID, Pick Product/UPC, Pick Quantity and Pick to Pallet. Then tap SUBMIT to save the information.
- Tap CLOSE STEP then return back to step page.
