Create a New Receipt and Entry
Before executing the receive task, you need a receipt to know the details of the task. Also, it’s important for driver to complete check in. This article introduces how to create a new receipt manually and how to create a new entry for the drivers.
How to Create a New Receipt
The Inbound process is where the warehouse formally accepts a shipment into the warehouse, it begins with a Receipt Notification (RN) or Receipt Confirmation (RC), which is a form that notifies the warehouse of an inbound order. This could be created by EDI or API, or manually entered into Item WMS.
WMS supports to create a new receipt by various methods including EDI/API, manually and etc. The following article introduces both manual and bulk methods.
Manual adding
-
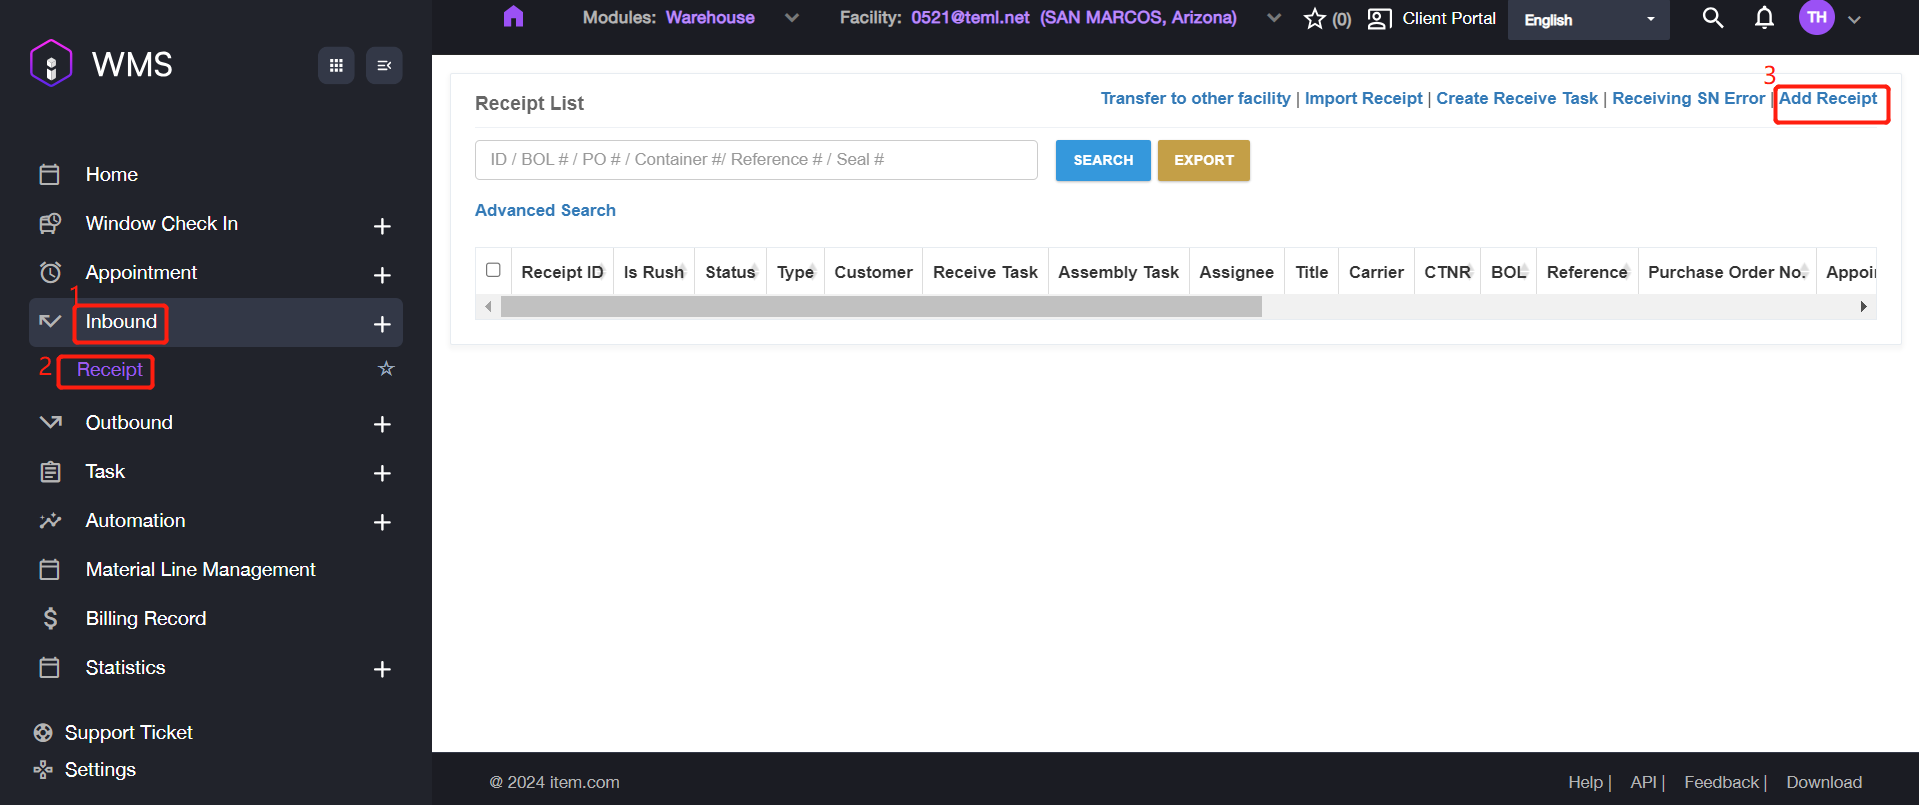
Navigate to Inbound > Receipt > Add Receipt.
-
Fill in the required information.
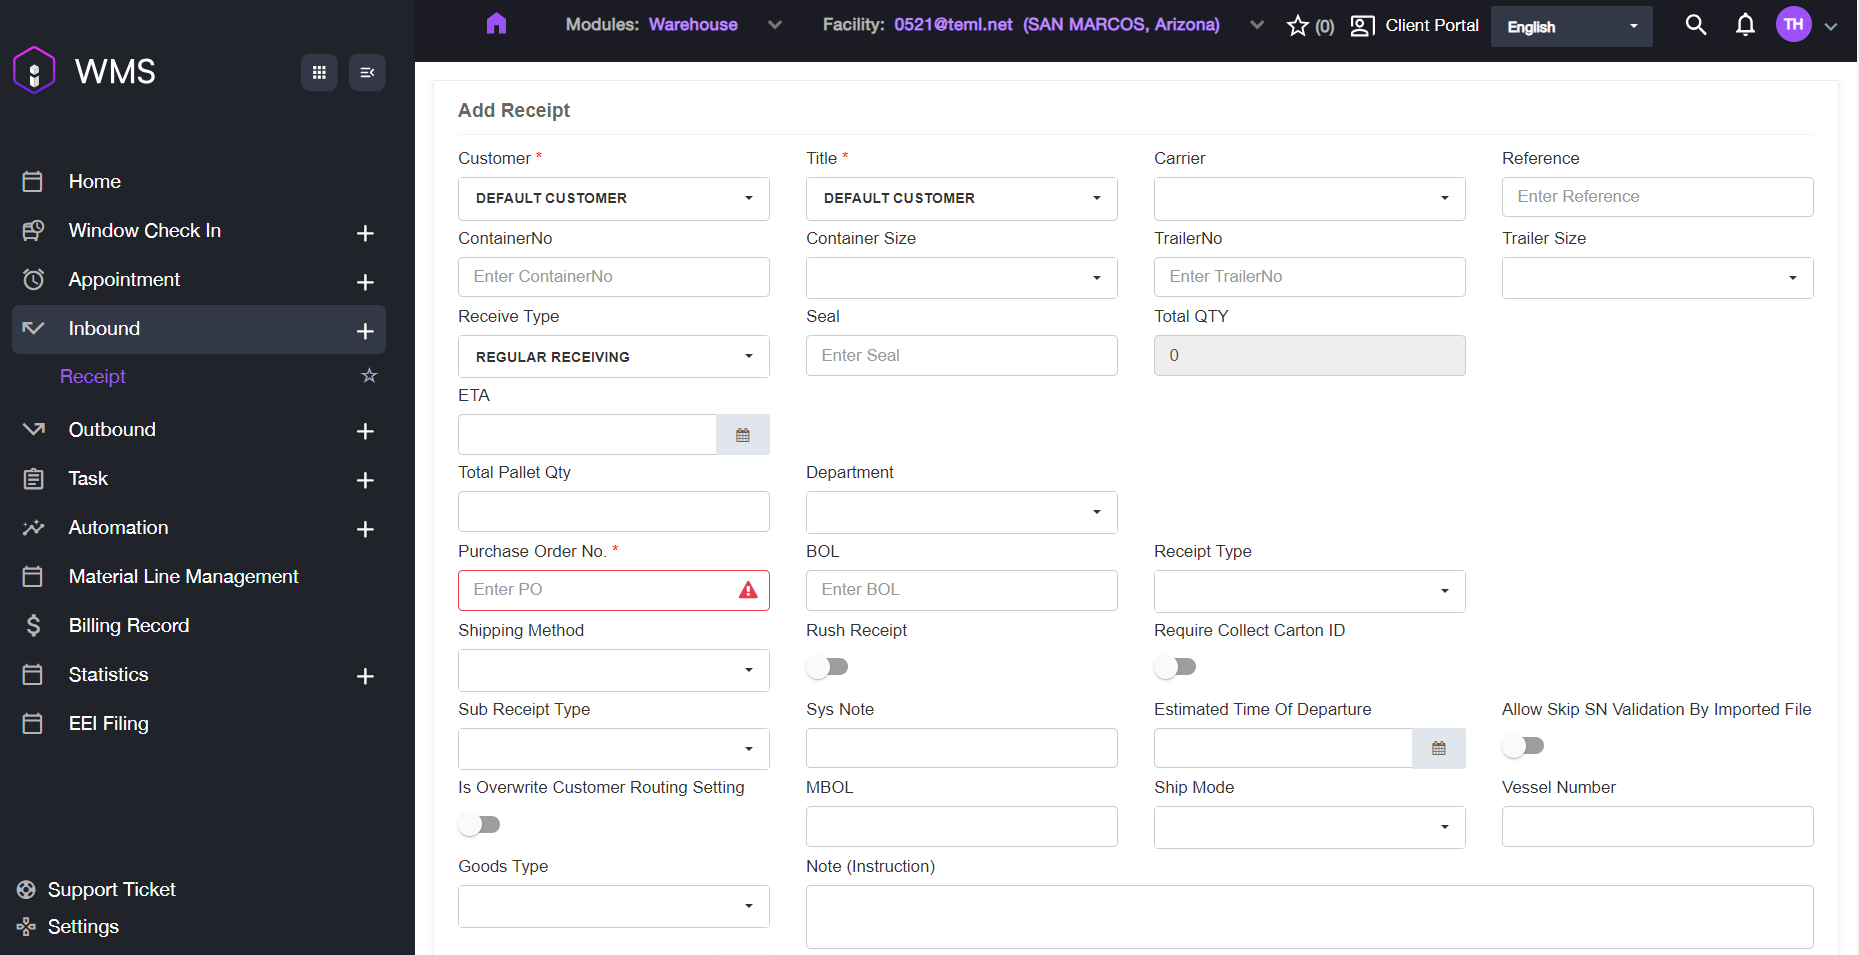
| Parameter | Description |
|---|---|
| Customer | Customer Name. |
| Title | Consignee name or title holder of the item. |
| Carrier | Carrier name |
| Reference | Unique identifying of an order. |
| Container No | Container’s unique identifying number. |
| Container Size | Size of the container. Value: 20’, 40’, 40H’, 45’. |
| Trailer No | Trailer’s unique identifying number. |
| Trailer Size | Size of the trailer. Value:48’, 35’. |
| Receive Type | Value: Bulk/ Regular Receiving |
| Seal | Container seal number. |
| Total QTY | Total expected item quantity. |
| ETA | Estimated time of arrival. |
| Total Pallet Qty | Total pallet quantity. |
| Purchase Order No | Inbound Purchase Order Number, uniquely identifies a purchase order and is generally provided by the buyer. |
| BOL | The billing of landing works as a receipt of freight services. A contract between a freight carrier and shipper and a document of title. |
| Receipt Type | Value: Regular Receipt/Title Transfer Receipt/Migo Transfer Receipt/Inventory Receipt/CrossDock/Sales Return/RDN/Auto Process Receipt/Customer Transfer/RTS/Internal Transfer Receiving/Transload/Purchase Return/Material Purchase/Assembly |
| Shipping Method | Value: Truckload (TL) / LTL / Small Parcel / Will Call |
| Rush Receipt | Indicates whether this is a rush order. |
| Required Collect Carton ID | Indicates whether the receipt requires collecting a carton ID. |
| Sub Receipt Type | Customized field. |
| Sys Note | Note generated by the system automatically. |
| Estimated Time of Departure | The estimated time of departure is the projection of time that is expected for a transport system to depart its point of origin/location. |
| Allow Skip SN Validation By Import File | Indicates whether SN validation can be skipped using an imported file provided. |
| Ship Mode | Value: Air/ Ocean/ Courier/ Truck/ Rail. |
| Goods Type | Select a type for the good. |
| Note (Instruction) | Receipt notes. |
-
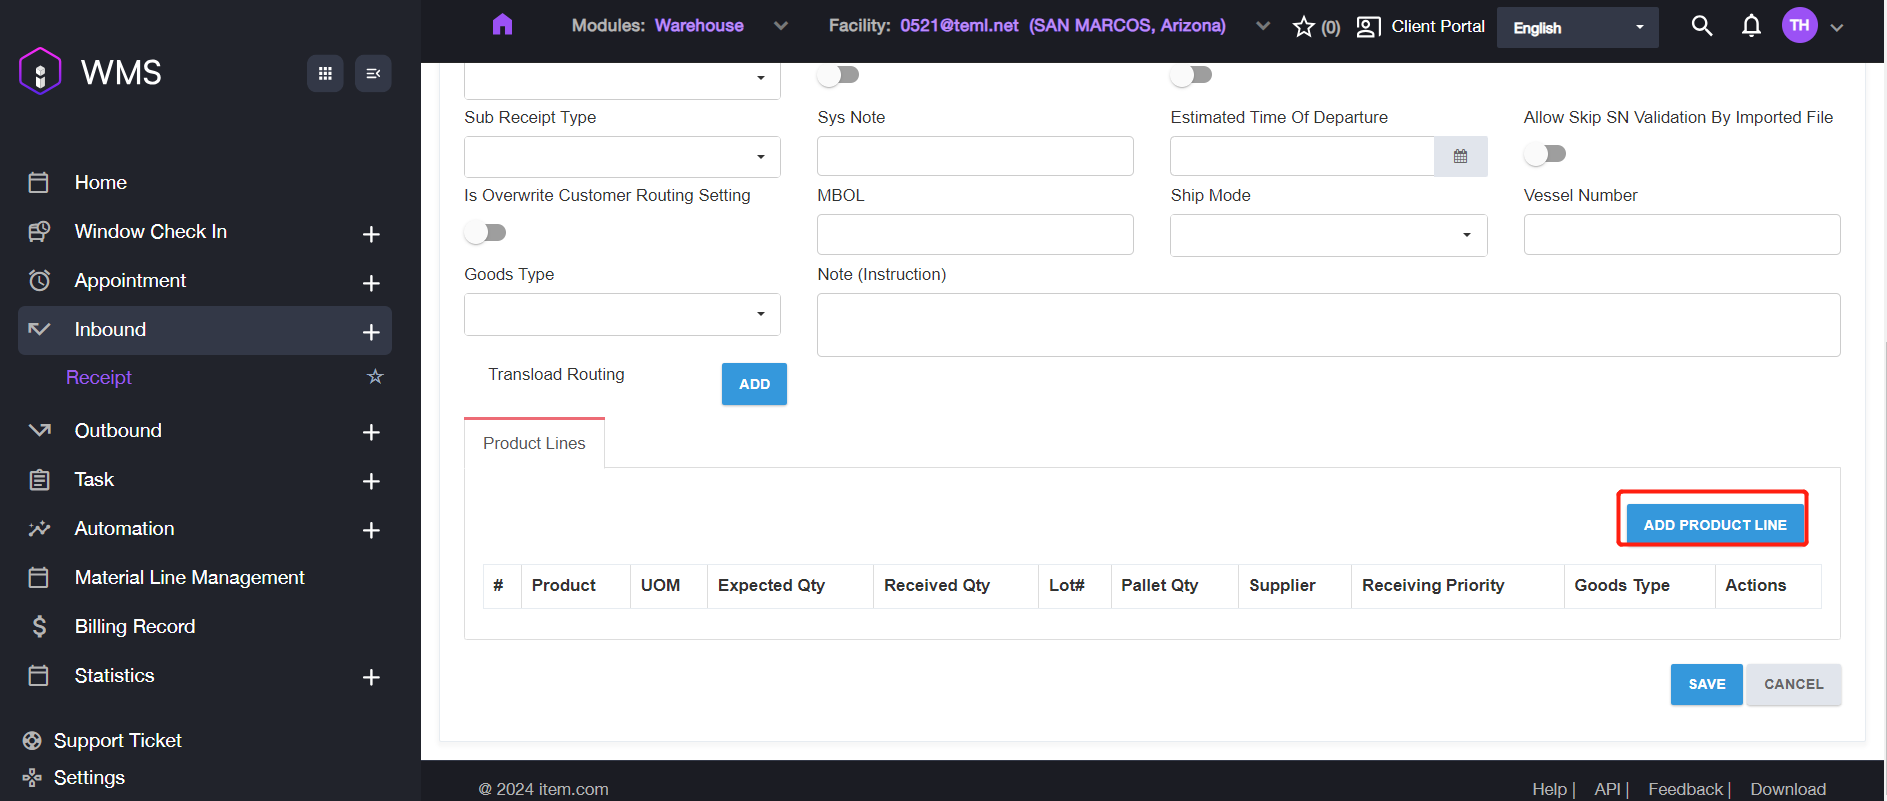
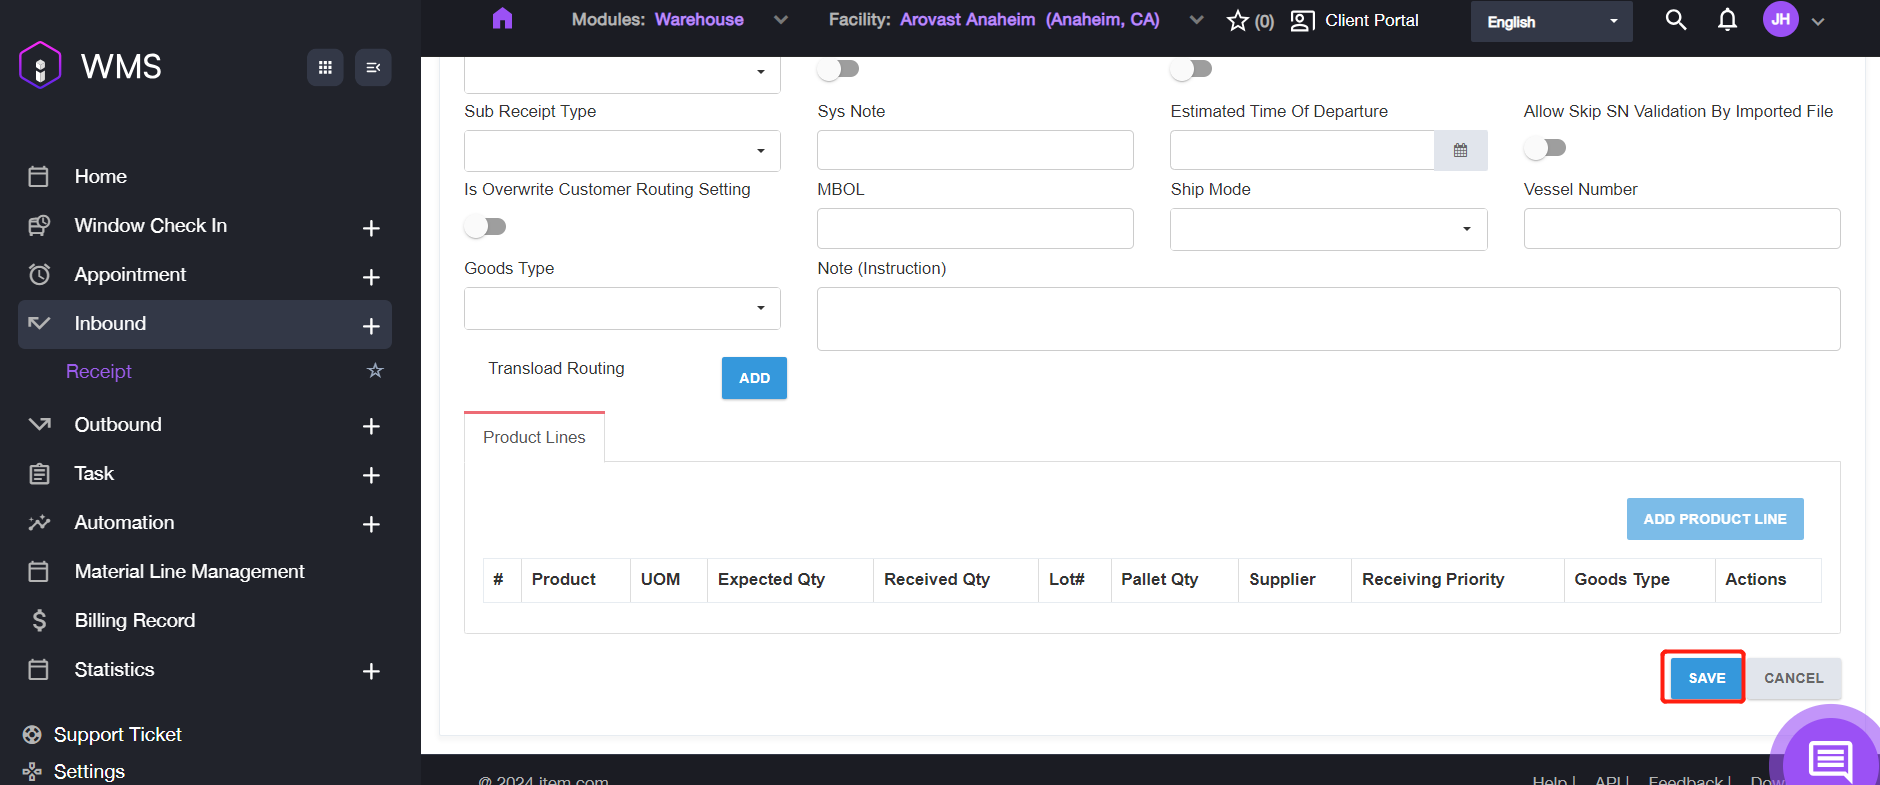
Click ADD PRODUCT LINE to add the first line to the receipt.
-
Fill in the information for the line, then click SAVE to save the receipt information.
| Parameter | Description |
|---|---|
| Product | Select one product specification from the list. |
| Supplier | A party that supplies goods. |
| UOM | Unit of measurement. Value: EA = Units/Each; CS = Case |
| Qty | The quantity of the products. |
| Pallet Qty | Expected pallet quantity to receive. |
| Lot# | A lot number is an identification number assigned to a particular quantity or lot of material from a single manufacture. It is used for FIFO, if you don’t have it, just leave it empty. |
| Purchase Price | The purchase price of the product. |
| Purchase Price Currency | Show the purchase price currency. |
| Origin | The origin of the product line. |
| Expiration Date | The expiration date of the product line. |
| Manufacture Date | The manufacture date of the product line. |
| Goods Type | Item commodity. |
| Note | Remark some notes. |
- Click SAVE to complete the progress.
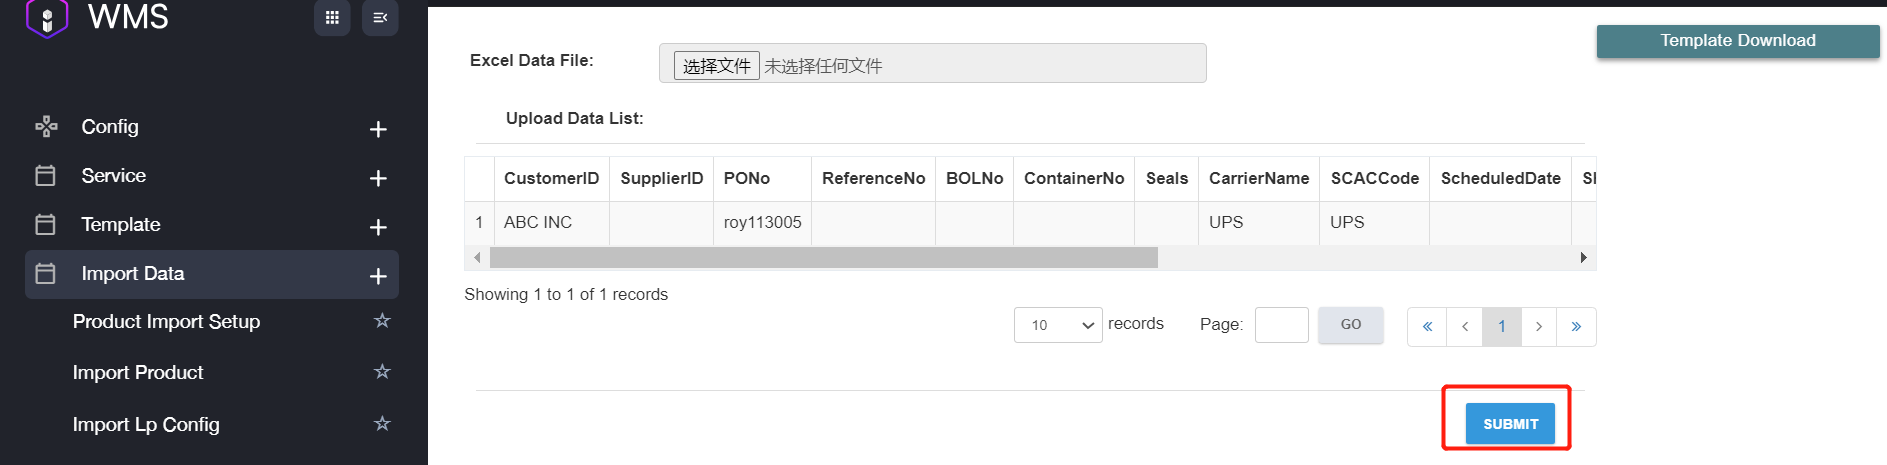
In Bulk
-
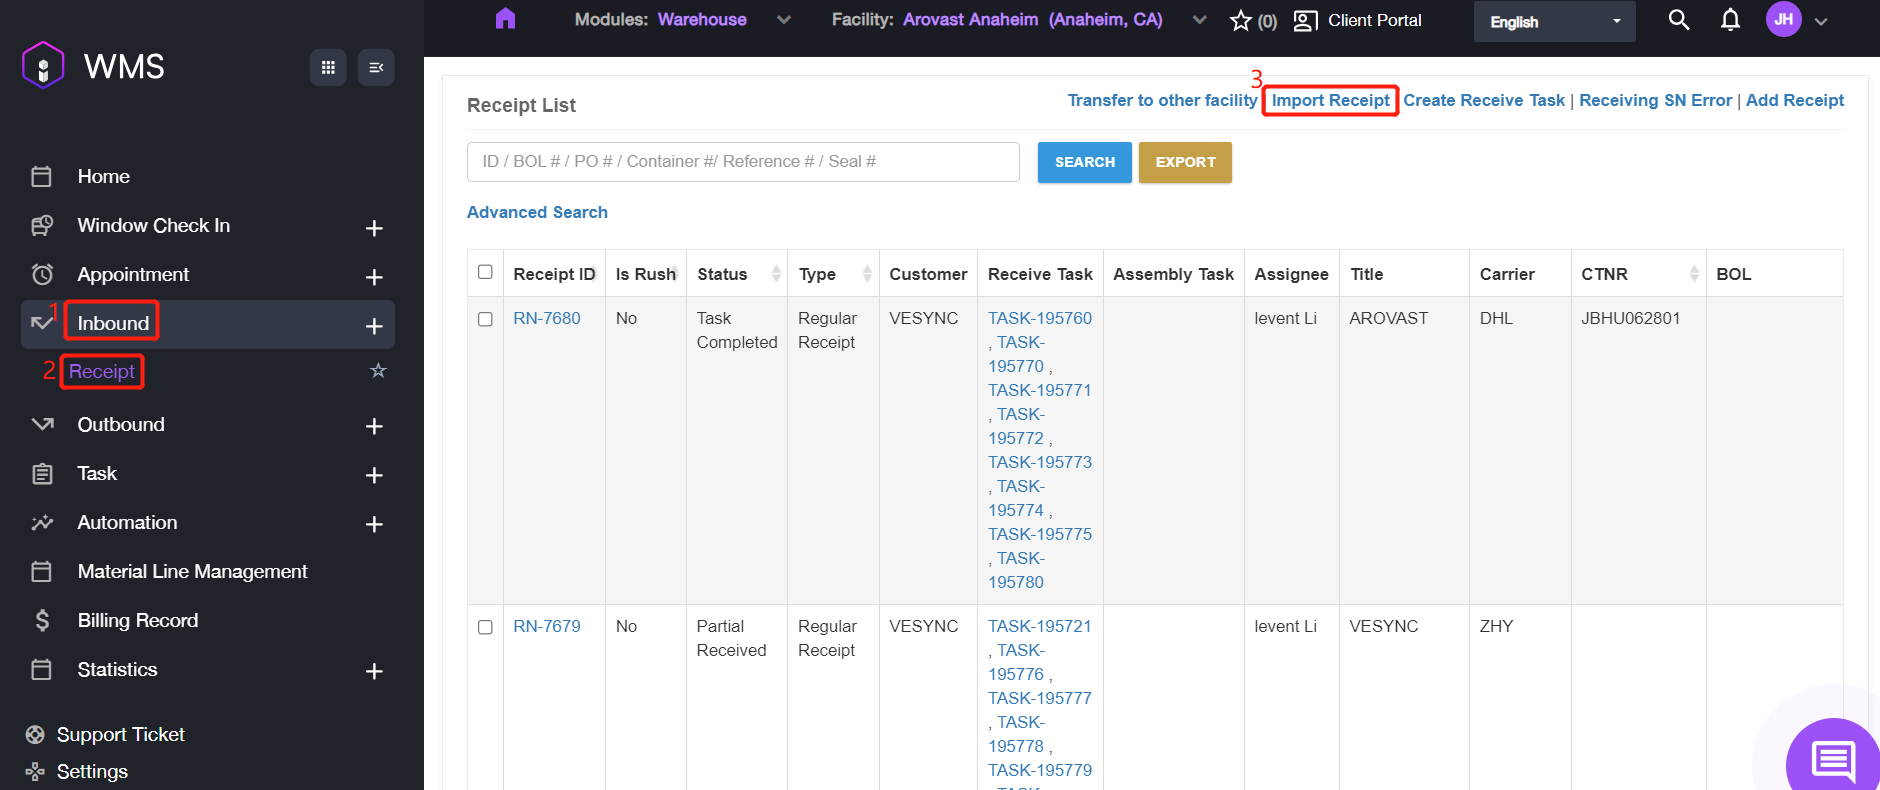
Navigate to Inbound > Receipt > Import Receipt.
-
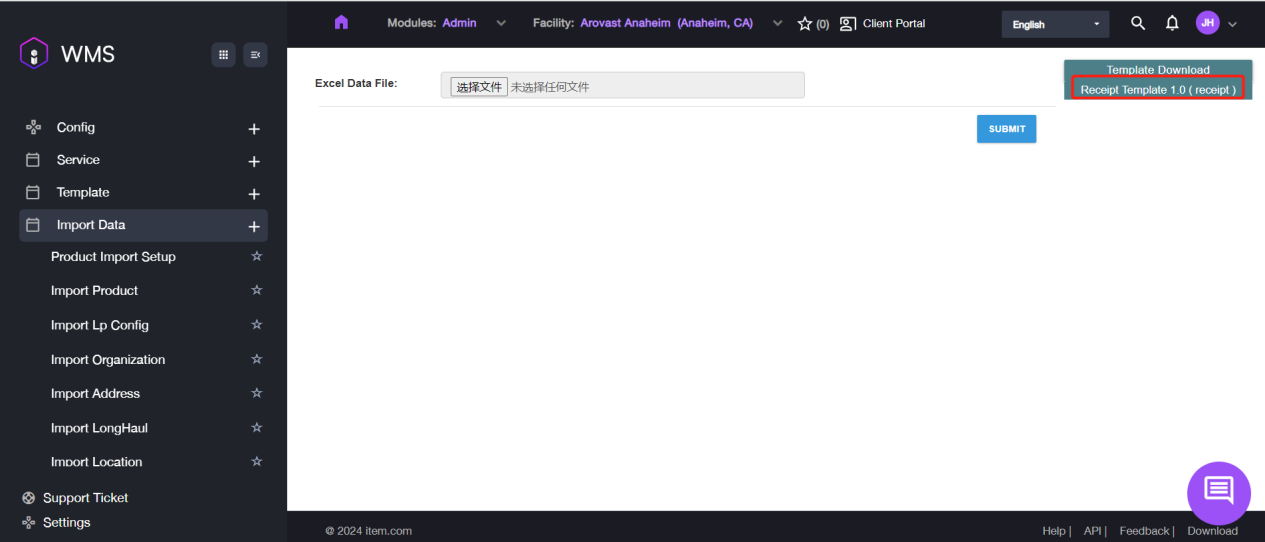
Please download the template file by navigating to Template Download then click Receipt Template 1.0 (receipt), if you didn’t prepared the data file yet.
-
Open the excel file, fill in the required information then to save it.

-
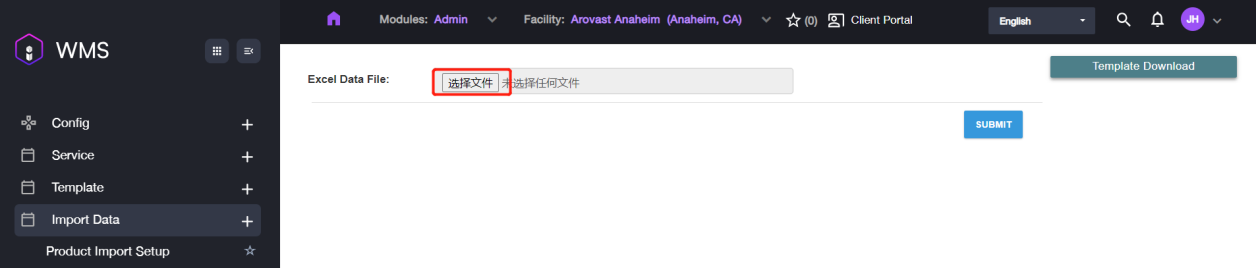
After configuring the data file, please click Select File button to upload the file.
-
After uploading successfully the data content will be shown here, if you found the information is incorrect or upload incorrect file, please click delete to remove the file and re-upload again.

-
If all information is correct, please click SUBMIT to complete importing receipts in bulk.
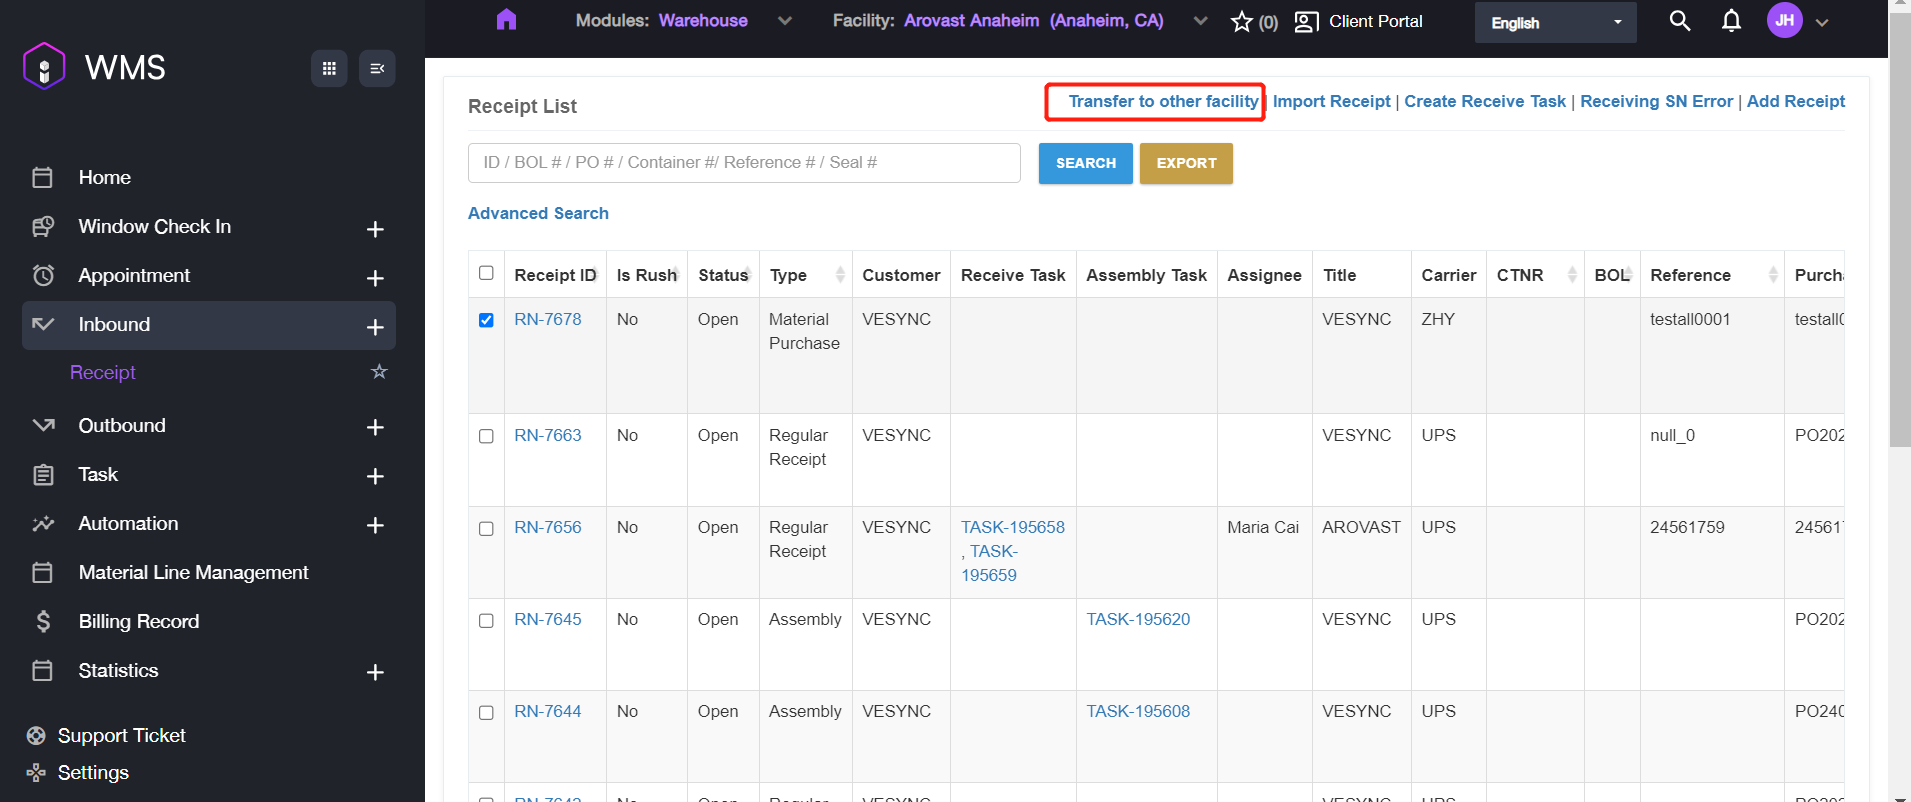
How to Transfer RN to other Facility
The feature is only available for receipt with Imported or Open Status.
-
Navigate to Inbound > Receipt, select the specific receipt and click Transfer to other facility.
-
Choose the target facility and click Transfer Receipt to process the transfer.
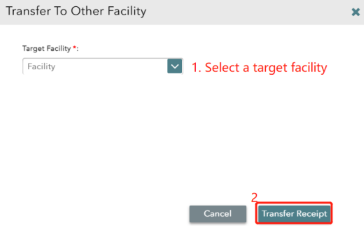 After transferring successfully, the receipt in current warehouse will be canceled and new receipt will be created in target warehouse.
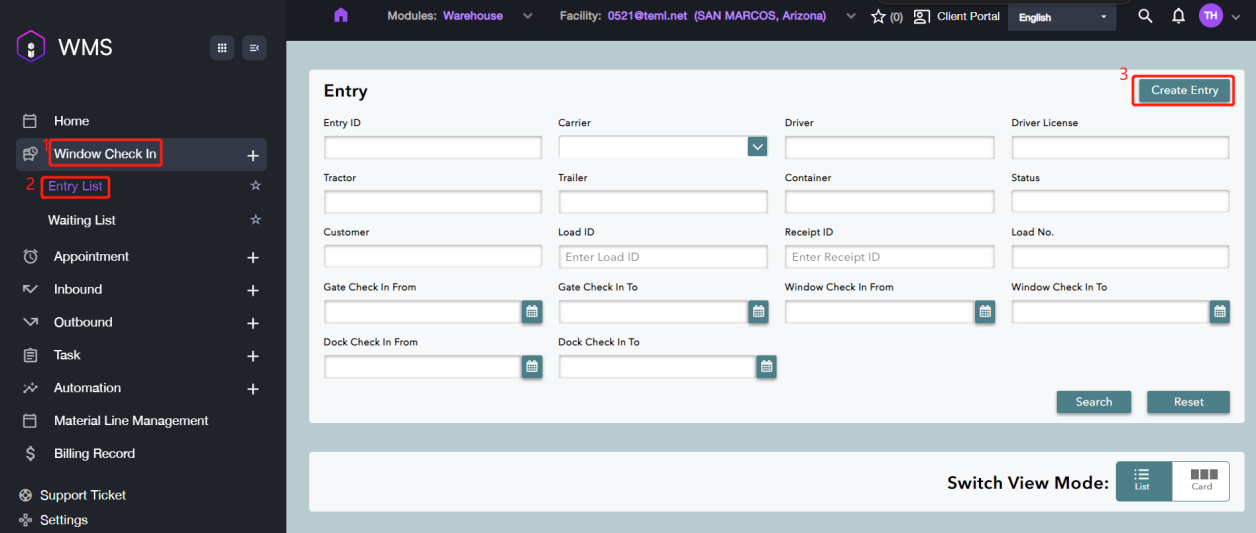
How to Create a New Entry
Entry IDs are a record to permit a vehicle (a tractor-trailer or box-truck) or container to enter the facility yard. These contain Check-in time and docks, the equipment, driver information and the Receipt Notification (RN) numbers.
-
Navigate to Window Check In > Entry List, click Create Entry button at the top right corner.
-
Select one entry type according to your requirements, then click OK for the next step.
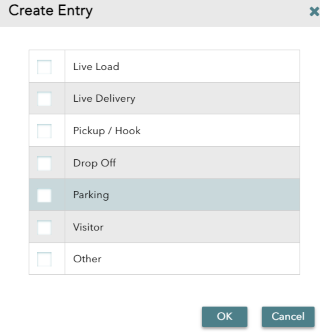
| Entry Type | Description |
|---|---|
| Live Load | Outbound orders where a trailer or container is loaded at the facility. |
| Live Delivery | Inbound orders where a trailer or container is offloading at the facility. |
| Pickup / Hook | No-touch freight service. A tractor arrives and picks up or drops off a trailer without loading or unloading. |
| A tractor arrives and picks up or drops off a trailer without loading or unloading. | Delivery at the gate, such as USPS and other delivery services. |
| Drop Off | Check this box if the vehicle or container is to be parked at the yard. |
| Parking | One-time guest. |
| Visitor | All types of entries not covered by the others. |
-
Click YES on the pop-up window to fill out the carrier information.
-
Enter the relevant carrier information for check in, then click on CONTINUE to next step.
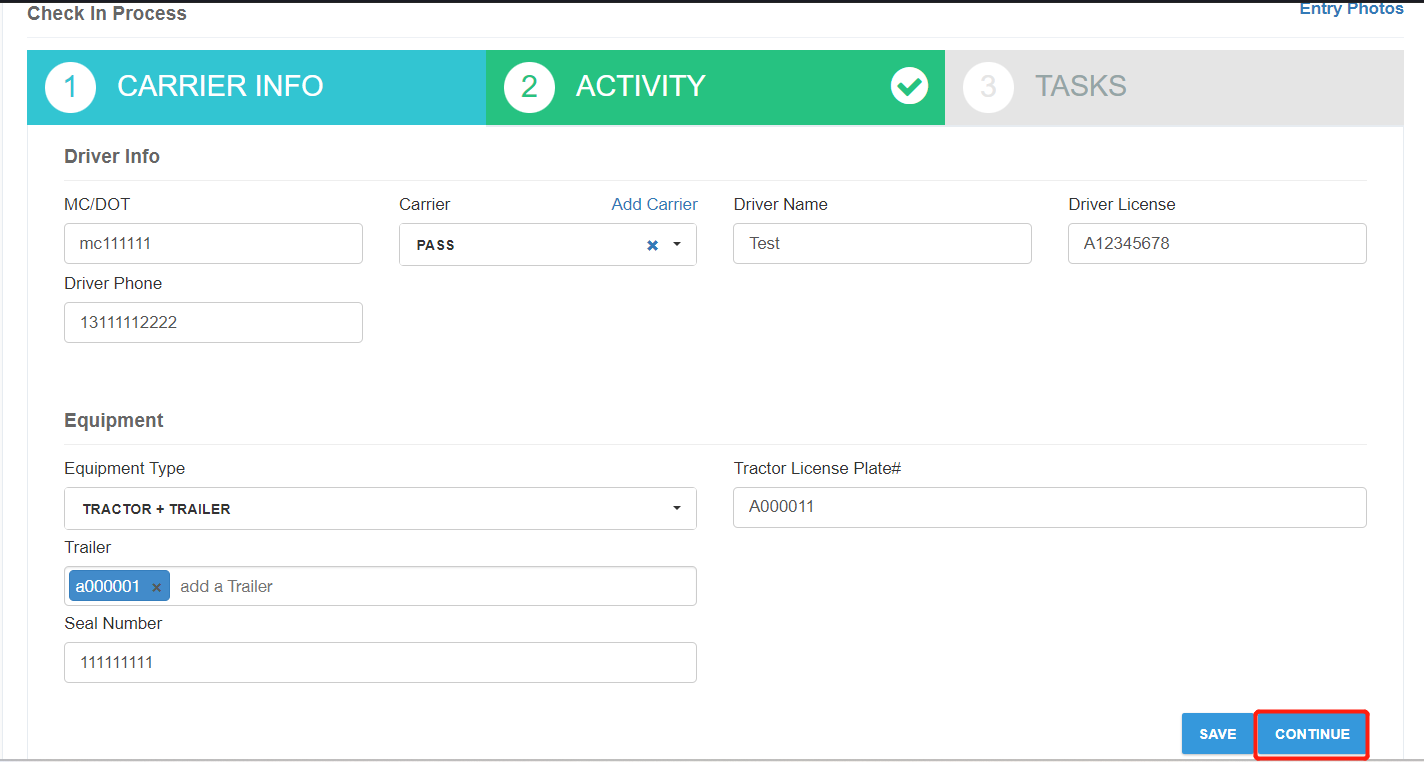
| Parameter | Description |
|---|---|
| Driver Info | |
| MC/DOT | Vehicle’s MC/DOT number. |
| Carrier | Name of the carrier. For example, FEDX_CG for FedEx ground. |
| Driver Name | Driver’s name from the driver’s license. For example, Steve Jimenez. |
| Driver License | Driver’s license number. For example, A3452341. |
| Driver Phone | Cell phone number to contact the driver. |
| Equipment | |
| Equipment Type | Type of vehicle or vehicle/trailer combination.**Value:**Bobtail Truck/Box Truck/Car/Tractor + Container/Tractor + Trailer/Tractor + Flatbed/Other/Tractor Only/Rail |
| License Plate | License plate number of the vehicle. |
| Container | The container ID. |
| Trailer | Trailer’s license plate. |
| Seal Number | Seal number of the container. |
-
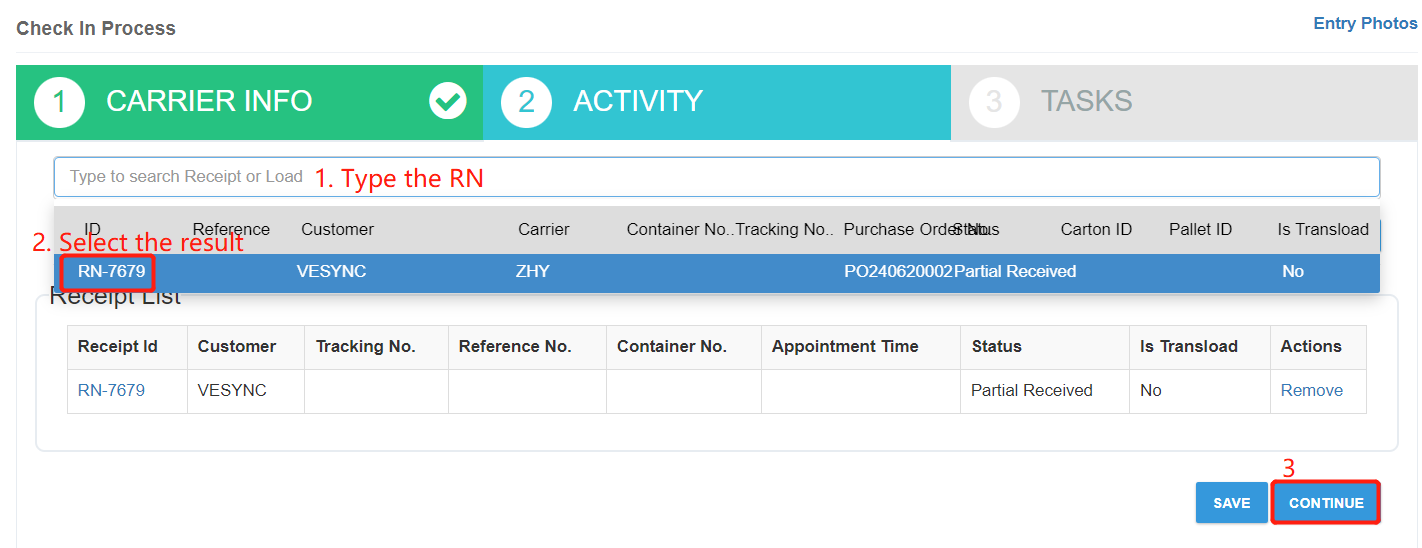
In the Activity tab, please type an RN in the Type to search Receipt or Load box, and click the RN in the result list to associate it to the Entry ID. And then click Continue to next step.
-
In the Task tab, please assign an Assignee and an available for this task. Please enter the short description of the task in the description box if you need.
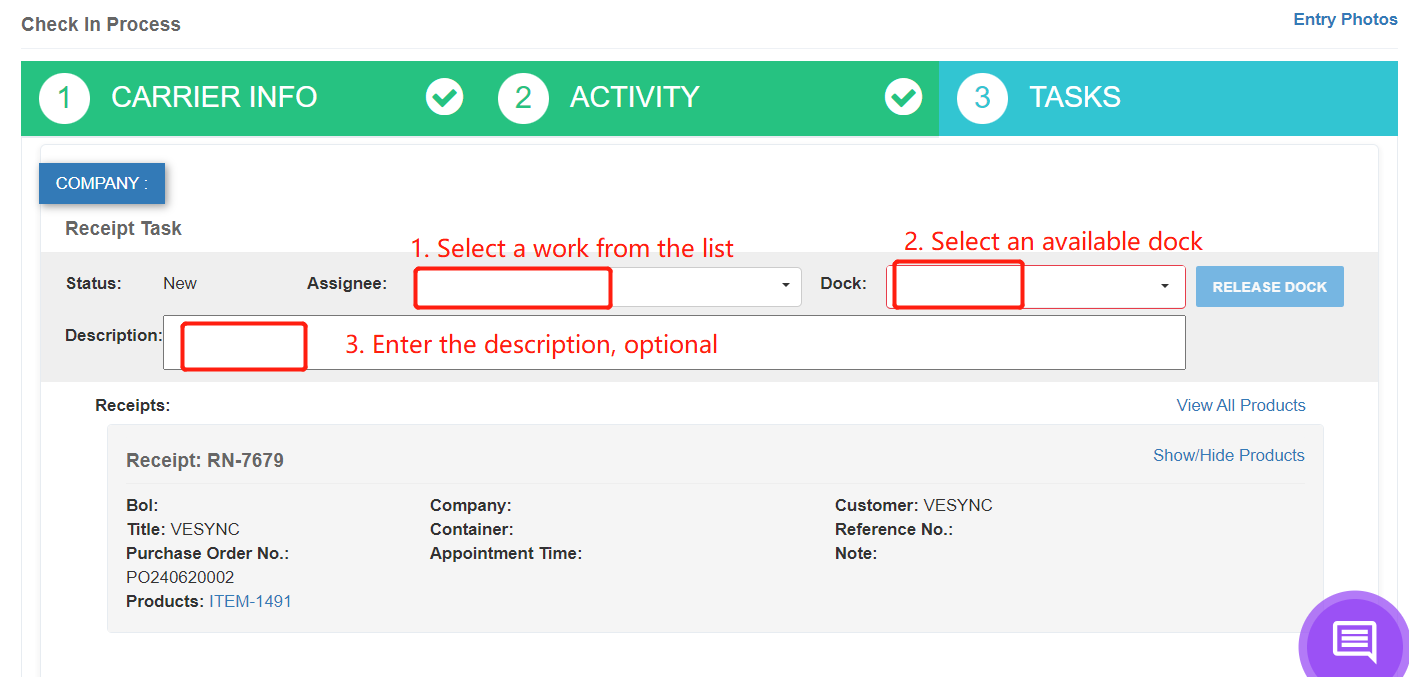
| Parameter | Description |
|---|---|
| Assignee | Name of the warehouse employee who will perform the task. |
| Dock | Dock number, corresponding to where the goods will unloaded or loaded. |
| Description | Description of the task. |
The assignee will receive a notification of the corresponding task on their WMS mobile app. Then they will follow the guidance on the app to complete the receive task.