Introduction to Self-Onboarding
The self-onboarding feature is designed to assist users in setting up essential configurations before using item applications for their business. It offers a step-by-step guide, best practices, and trainings, making it easy for users to complete the onboarding process and quickly get familiar with the system.
| Target users | Recommended plans | Business Scenarios |
|---|---|---|
| Small business | App, Starter | Focuses on basic features like order management, inventory syncs, and manual shipping label printing. A warehouse management system (WMS) is typically not required. |
| Retail business | Essential, Plus, Advanced | Ideal for businesses requiring an efficient WMS to manage inventory and data syncs between online channels and physical stores. |
| 3PL logistics | Pro, Unlimited | In addition to basic warehousing and delivery features, it’s designed for third-party logistics providers offering extra services like packaging, labeling, assembly, and transload. |
The services, features, and supported applications vary depending on your subscription plan. For more information, see Plans & Features (opens in a new tab).
In the self-onboarding section, it contains four key areas displaying the following information:
- My Plan: Lists the services included in your subscription.
- Features: Highlights the features available to enhance your business operations.
- App Comparison: Quick access to compare available apps and check additional details.
- Supported Apps: Displays the item applications included in your current plan.
For example: the Starter and Pro plans offer distinct user interfaces, showcasing the different features available to users of each plan.

Plan: Starter
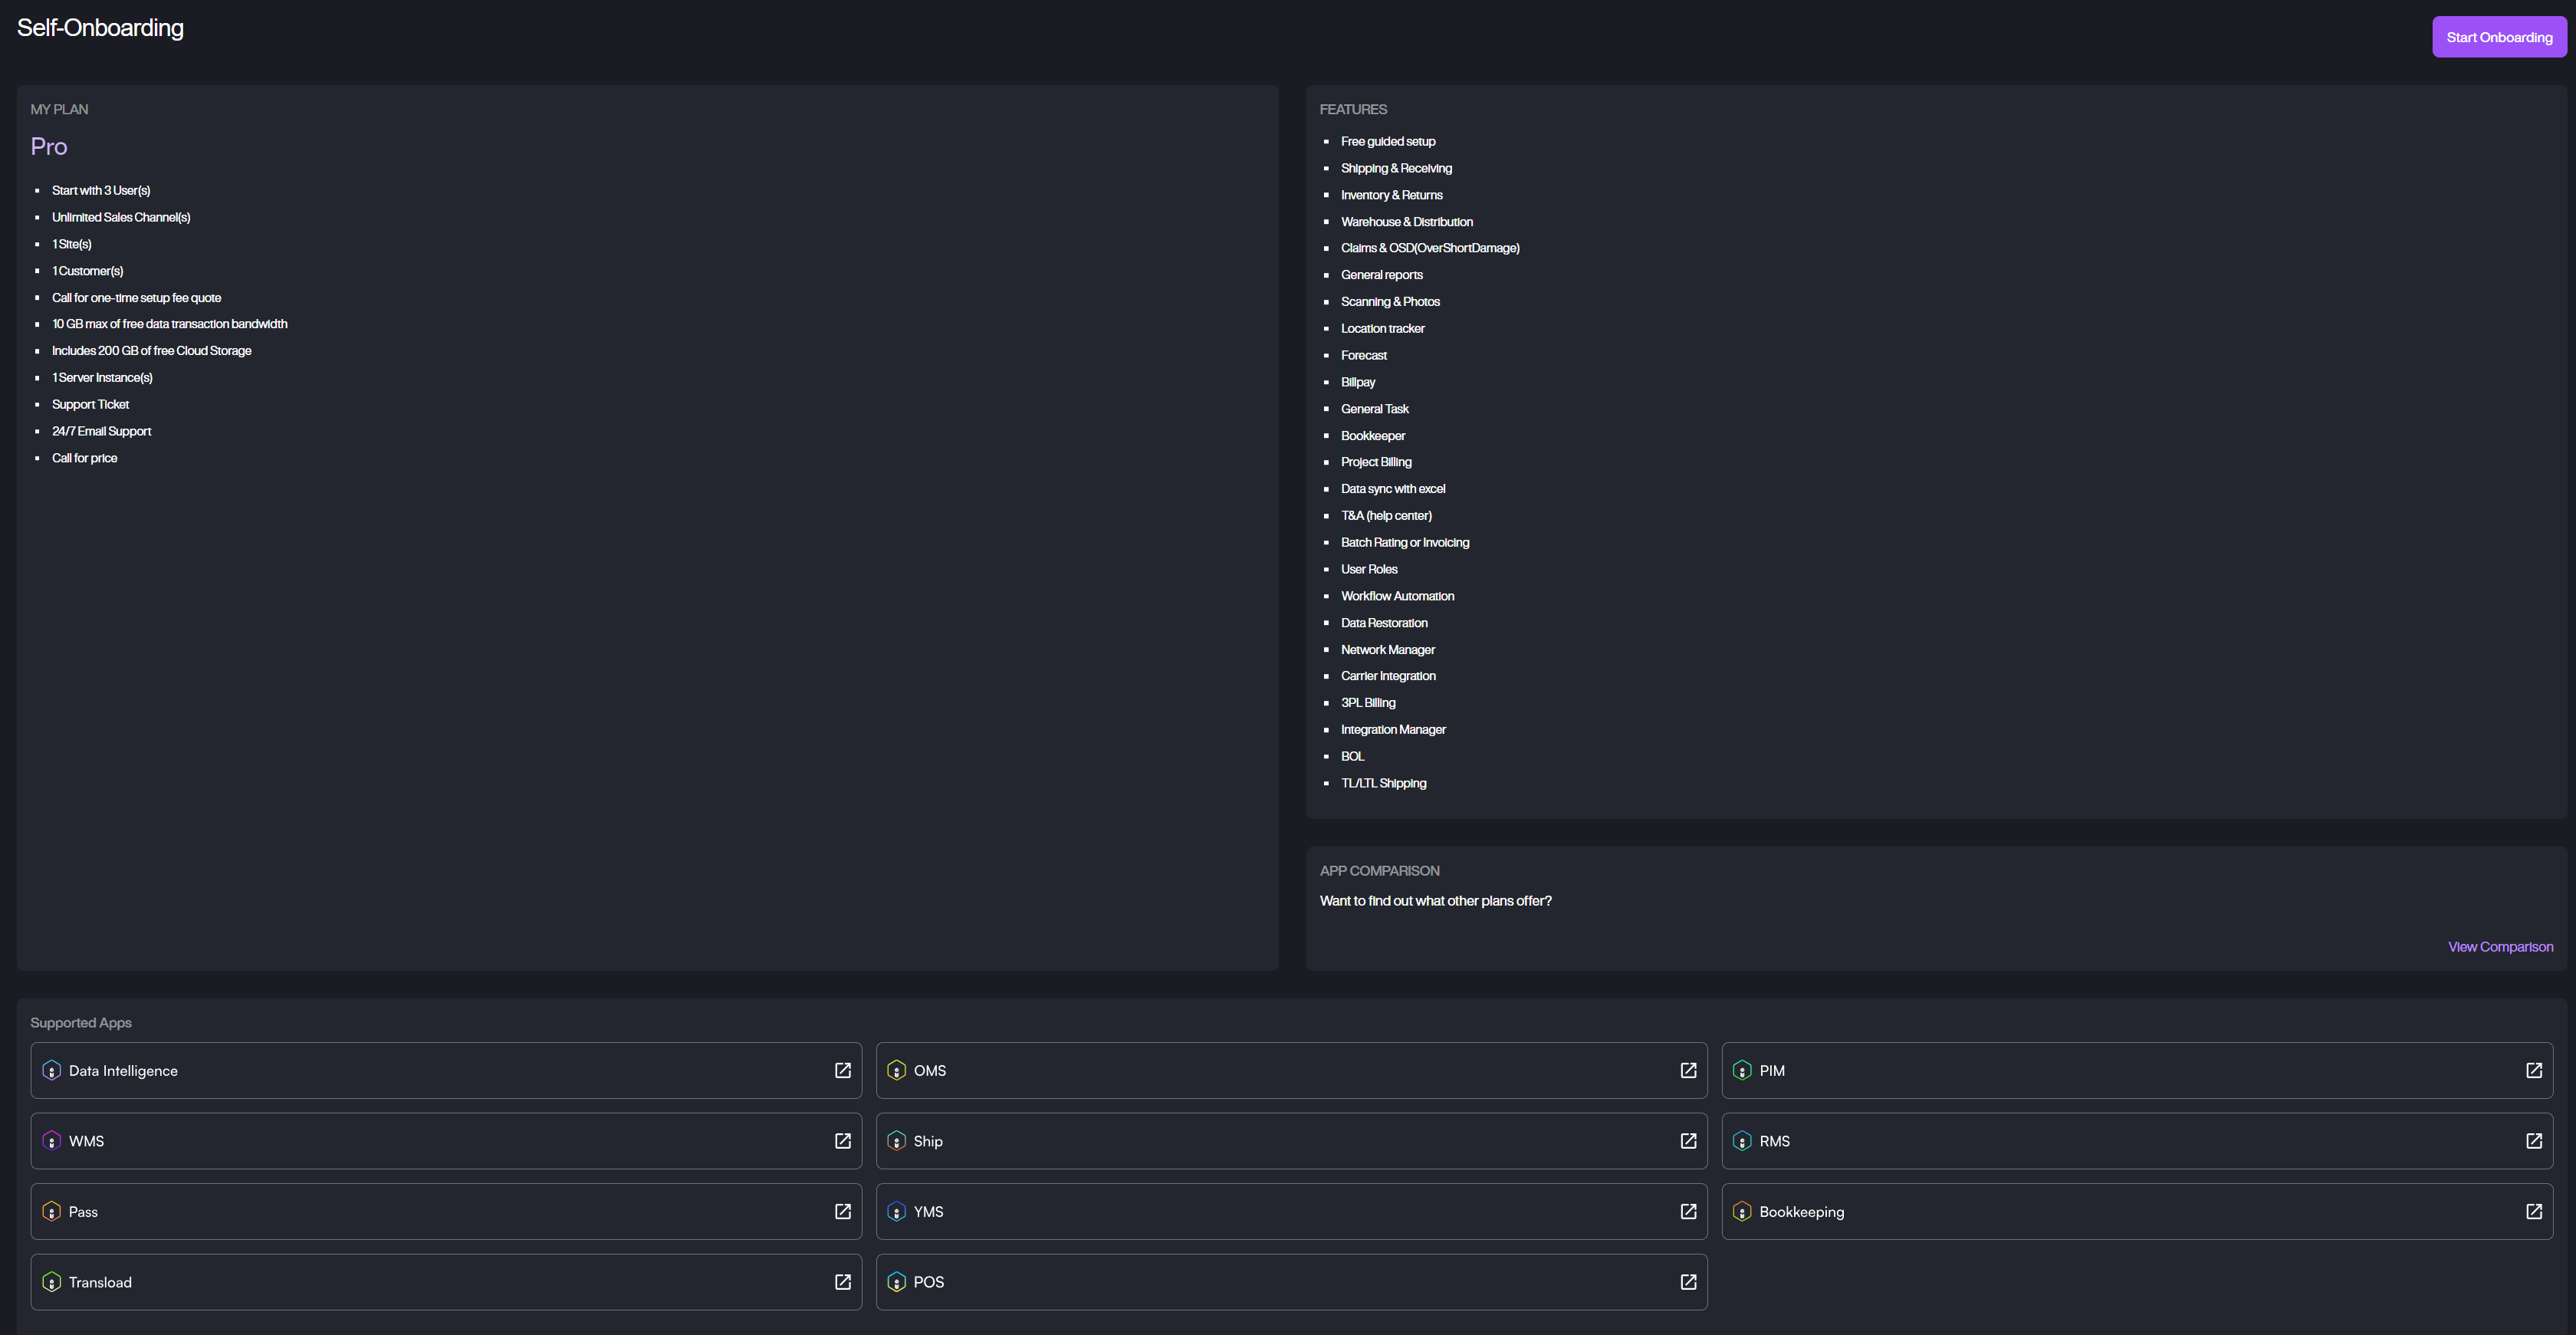
Plan: Pro
Self-Onboarding Guide
This guide takes Plan Pro as an example and provides step-by-step instructions to help you successfully complete the self-onboarding process.
User Interface
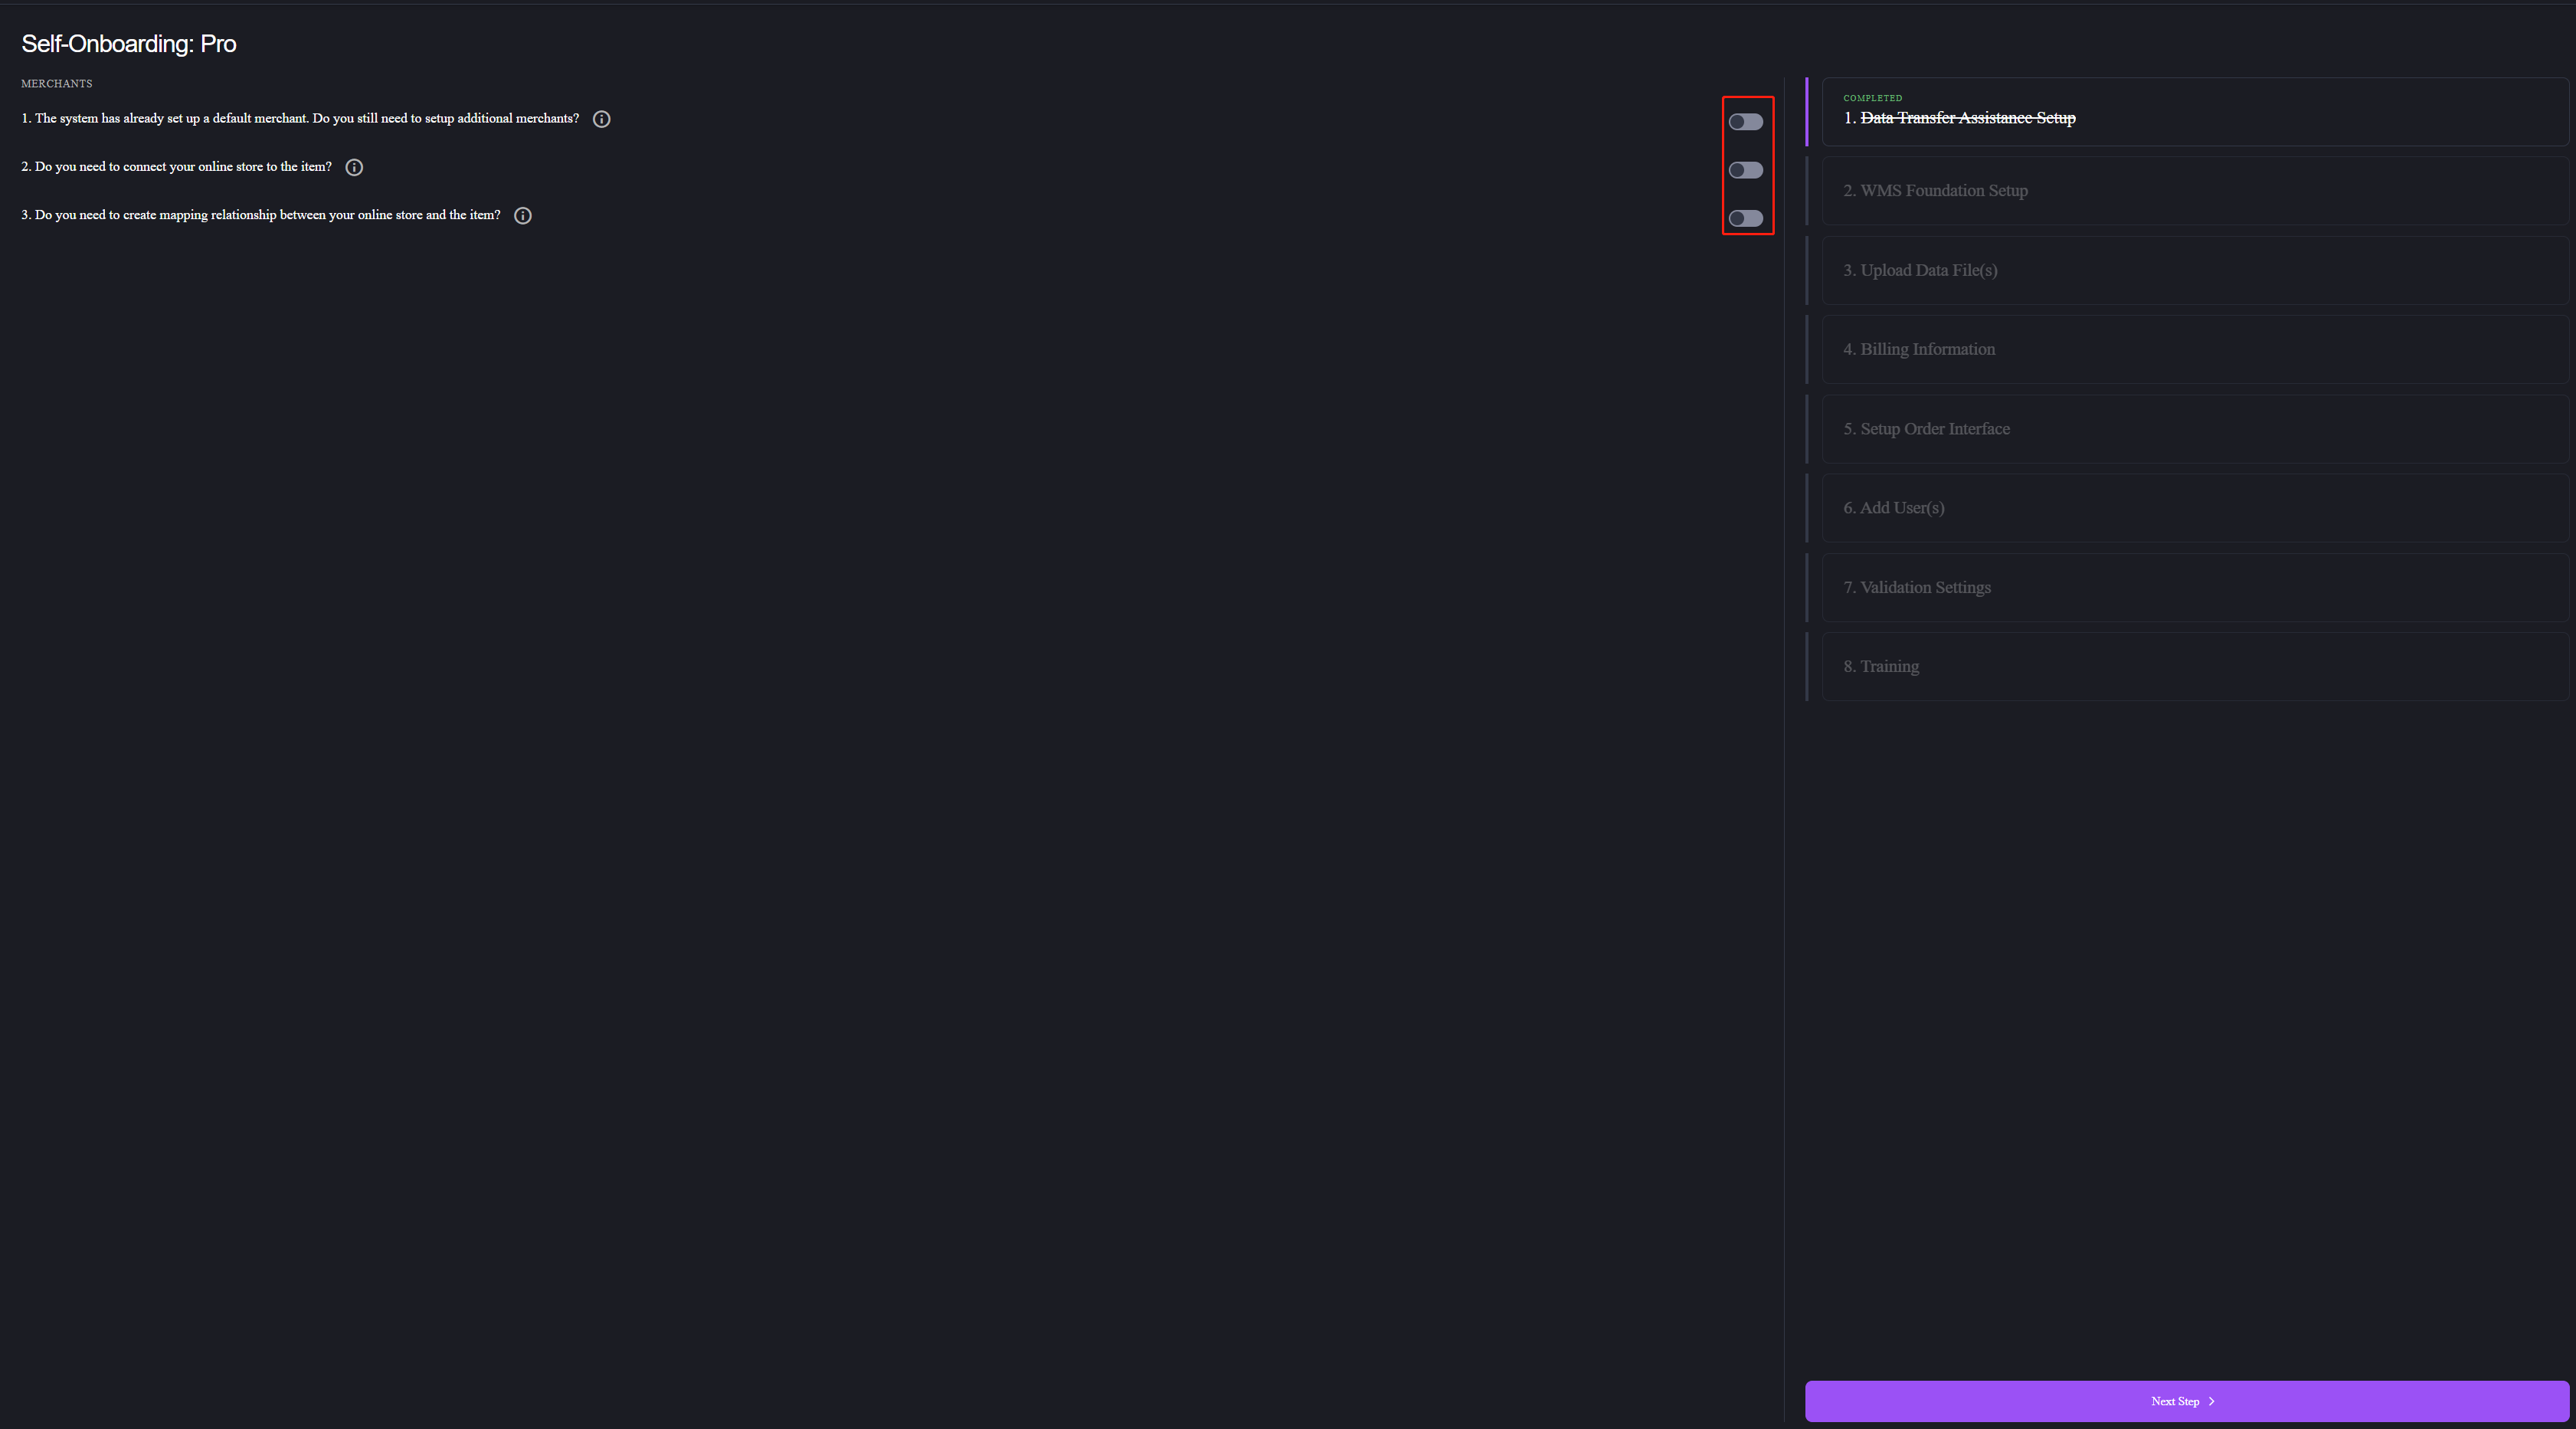
When you begin the self-onboarding process, the default interface is divided into two sections. The left side shows the configuration options, while the right side tracks your progress, listing the steps that need to be completed. The toggle switch of each setting is turned off by default.
Basic Settings (For Plan Pro)
Based on your plan, the system will display the required setup tasks on the right side of the page. Each plan may have different settings requirements. For Plan Pro, the following basic settings need to be completed:
- Data Transfer assistance Setup
- WMS Foundation Setup
- Upload Data File(s)
- Billing Information
- Setup Order Interface
- Add User(s)
Note: The number of users or sites (facilities) you can add is limited by your plan. Please review your plan details before adding more.
Start Onboarding
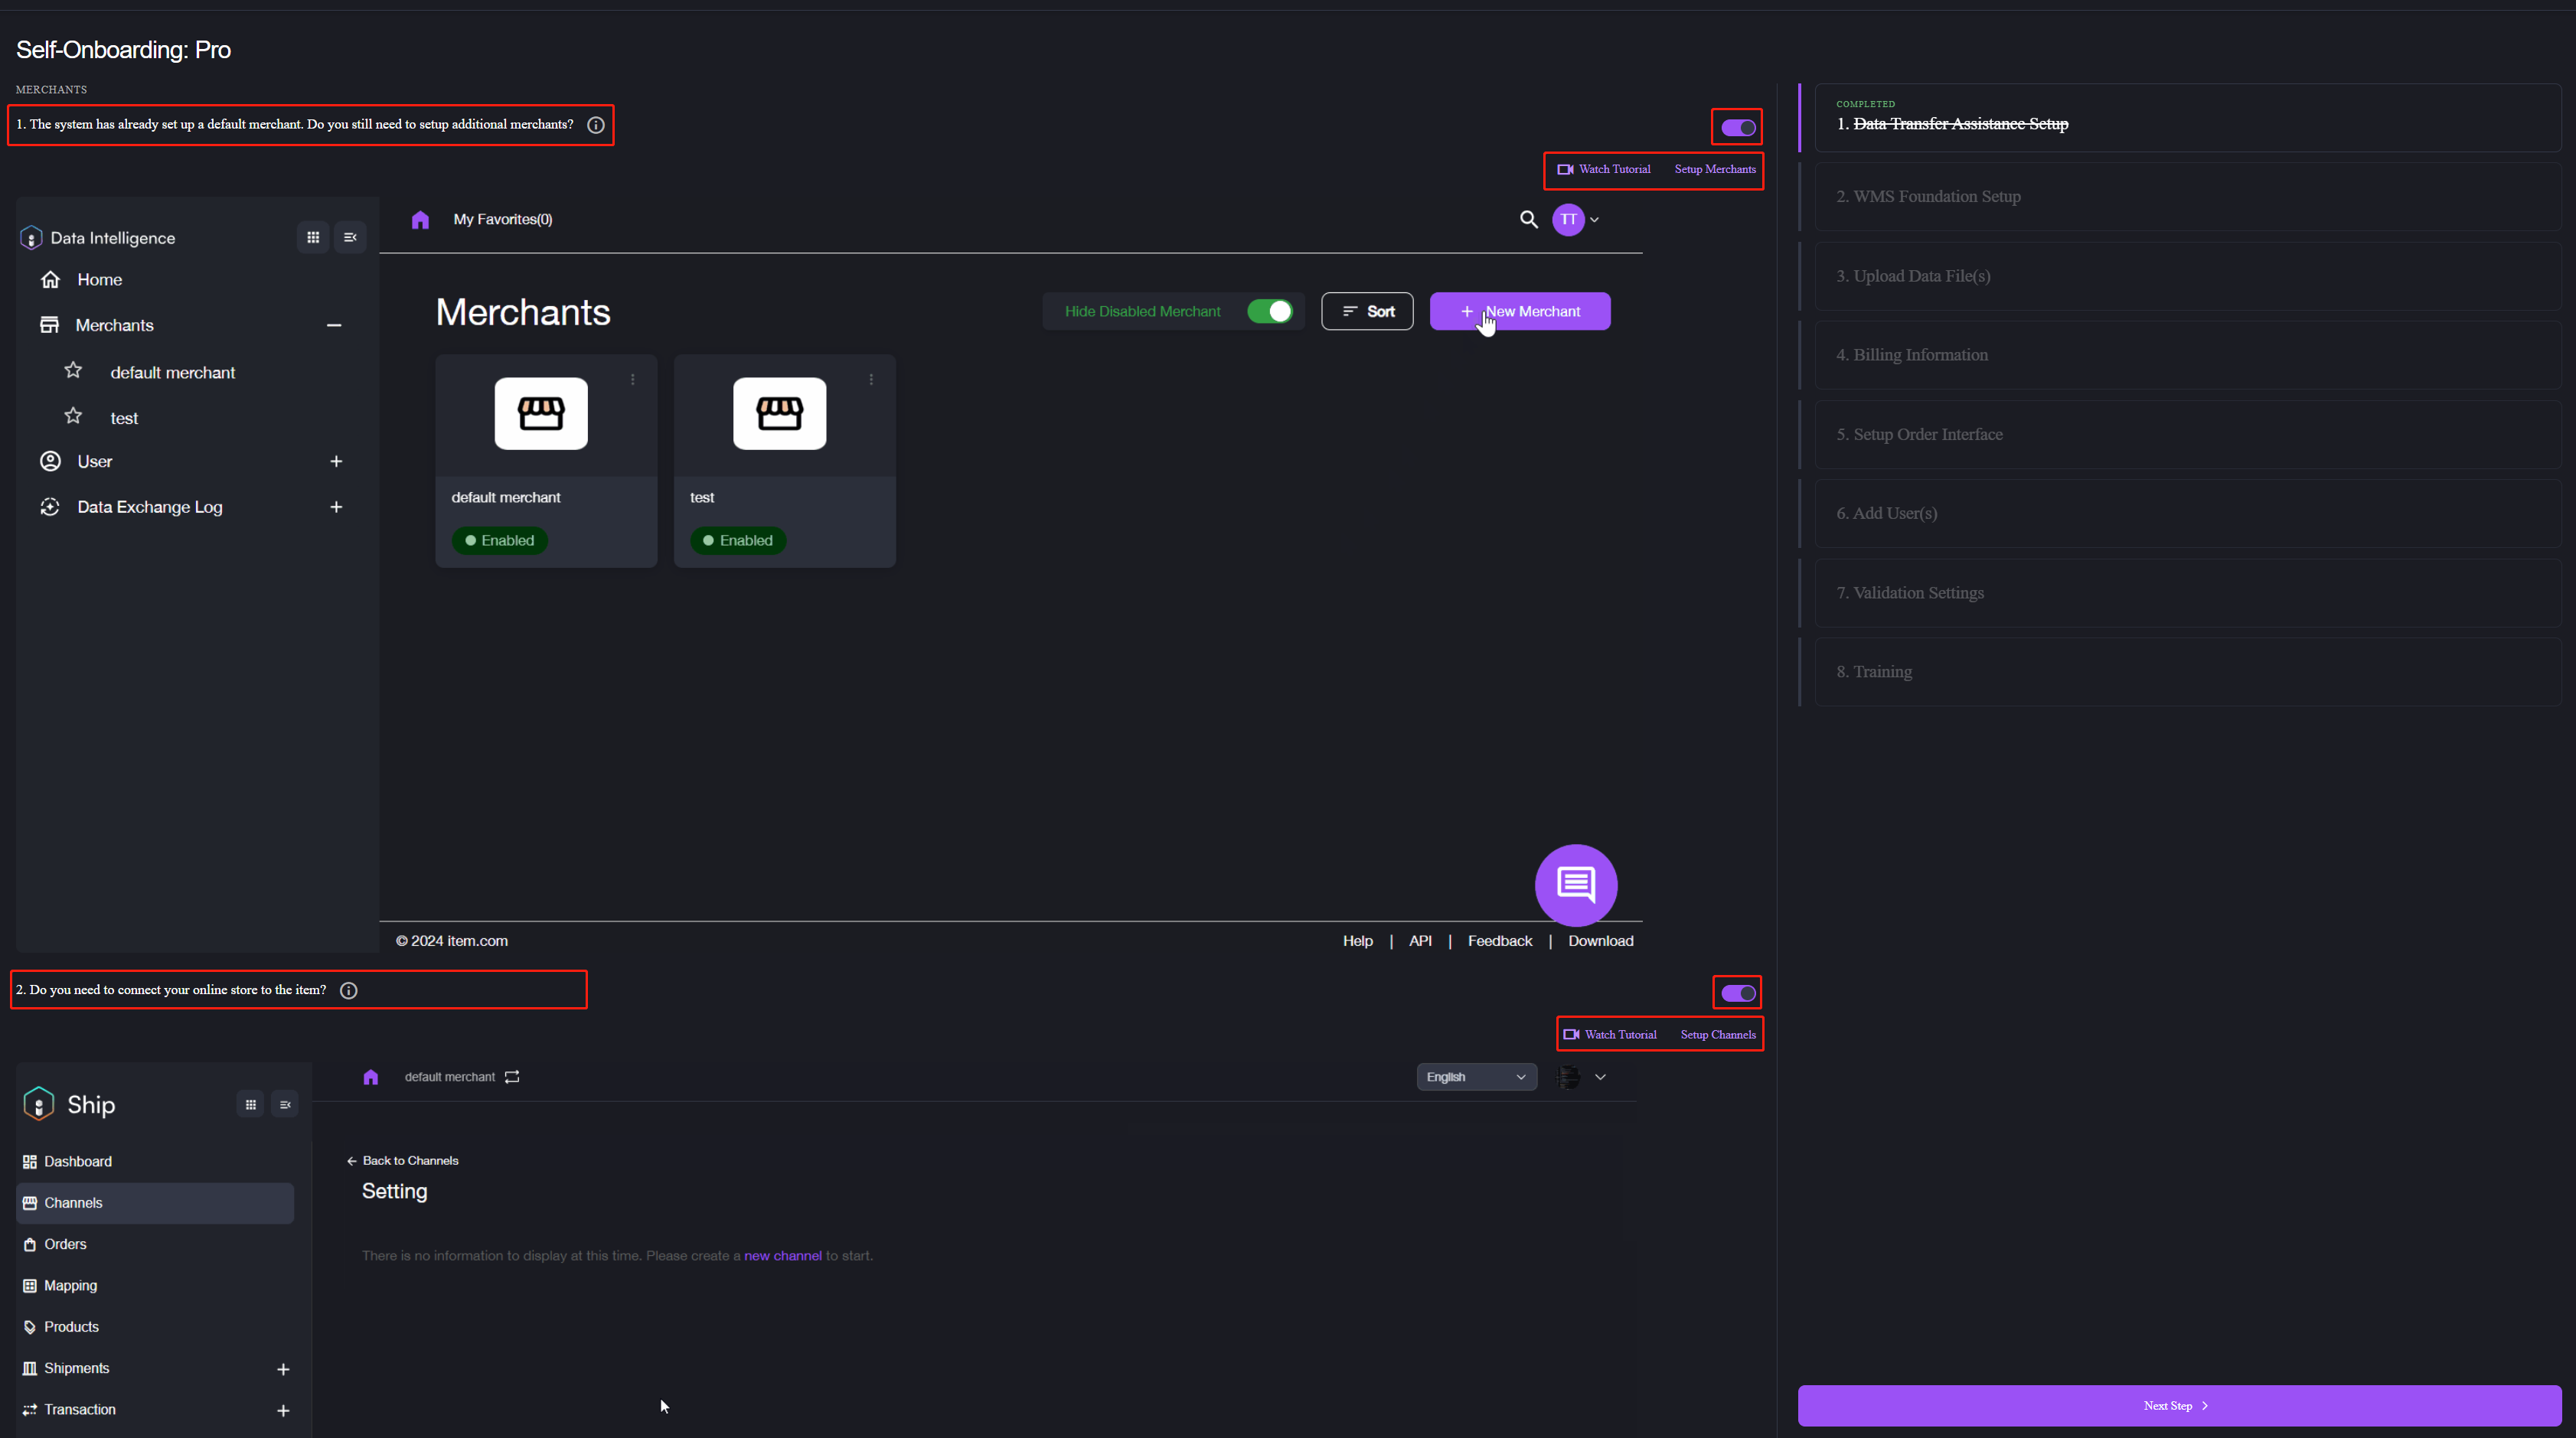
Step 1 Complete Basic Settings
- Log in to my.item.com with your account.
- From the side menu, navigate to Self Onboarding.
- Click the Start Onboarding button in the top-right corner.
- Perform the following key actions to configure each setting and follow the step-by-step instructions for each setting to complete the onboarding process:
- View descriptions (Exclamation mark): Each setting is presented as a guiding question, followed by an exclamation mark. Clicking it will show more details about the setting, including its definition, relevant business scenarios, and use cases, to help you better understand its purpose.
- Toggle on/off switch: Activate each feature by turning on the switch to begin configuration. The default setting is off.
- Watch tutorials (Video icon): In addition to the tutorial GIFs, you can watch the tutorial video by clicking the video link for more guidance.
- Configurations(e.g., Setup Merchants): Clicking this will open the corresponding settings page in a new window, with step-by-step instructions to guide you through the process.
- Action buttons: Use Previous Step and Next Step to navigate through the onboarding process.
- After completing each setup, click Next Step to proceed. When a setup is finished, return to the self-onboarding page to continue with the next task.
- Repeat until all required settings are completed.
Step 2 Check Validation Result

The Validation Settings section displays the final status of your configuration progress. Each setting is marked with an icon that indicates the following:
- PASSED: The setting for the corresponding feature is completed successfully.
- Exclamation Mark: The setting has not been configured yet.
- SETUP: Clicking this link takes you to the setup page in a new window, where you can complete the required configurations.
Step 3 (Optional) Start Training
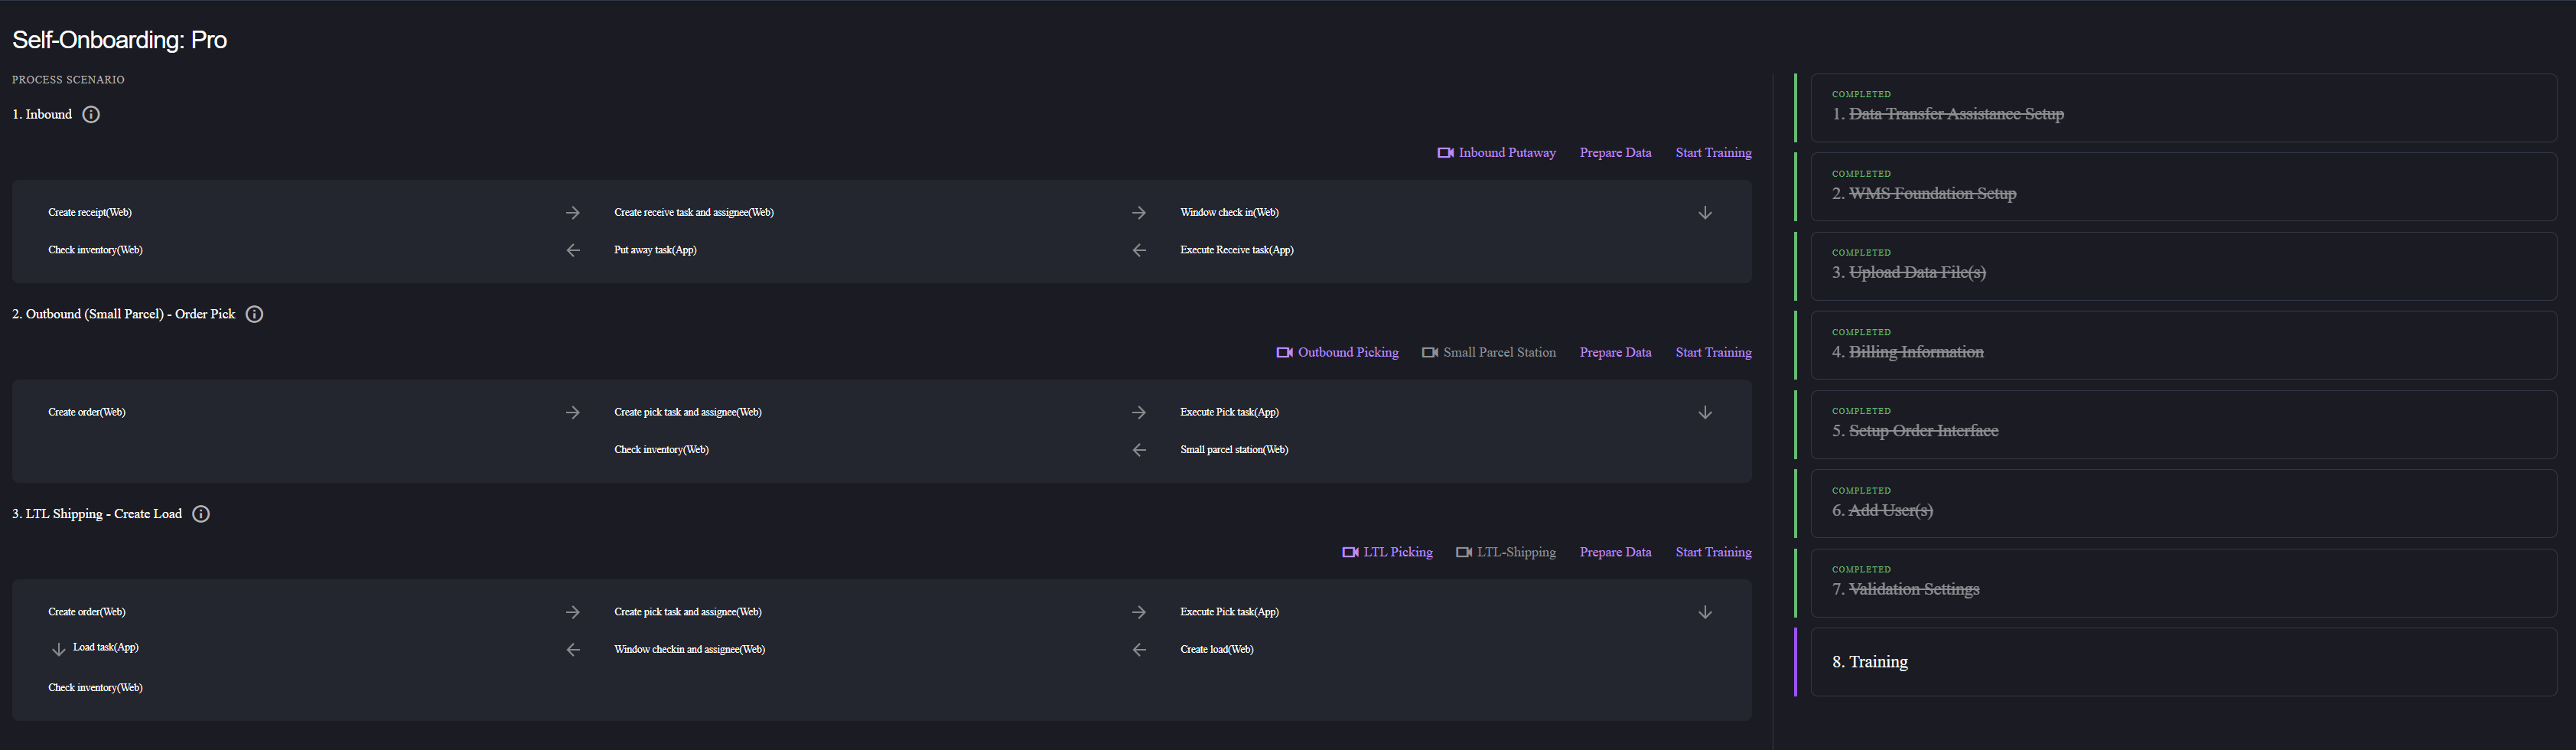
This section offers additional training on WMS-related features to help you get familiar with the system.
Perform the following key actions to start training and repeat the process for each feature:
- Watch tutorials (Video icon): Watch the tutorial videos for specific features like Inbound Putaway or Outbound Picking by clicking the video link.
- Prepare Data: Click Prepare Data, and the system will automatically generate data for your training.
- Start Training: Click Start Training to be redirected to the relevant page, where you can follow the step-by-step guide for the training.
If you have not finished all settings at one time, you can return to this self-onboarding feature at any time to continue the process.